[Warning] Legacy engines are deprecated. If you have developed a legacy batch engine, we highly recommend you upgrade it to a segment engine.
When either a Batch or Legacy engine is deployed to Veritone, a PAYLOAD_FILE environment variable is passed to them at runtime which contains the location of the payload file they need to process. The payload file itself contains all of the information the engine needs in order to process the job correctly. In order to test an engine of this type, you will need to simulate an incoming payload to verify your engine can process it successfully. You can get a valid payload to test locally with by following the steps below.
Testing Locally
- Click on the "Create Task" button shown on the tasks page of your engine.

- Next click "Browse to Upload" and then choose a media file for your engine to process.
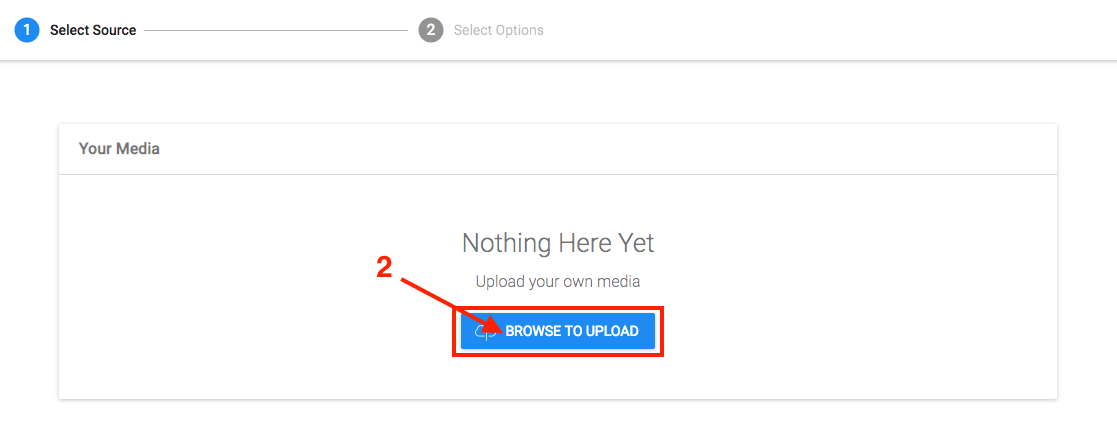
- Once you have chosen an appropriate media file, click Next to proceed to the next step
Select Options. From the dropdown, select the build version Local in order to create a test task.
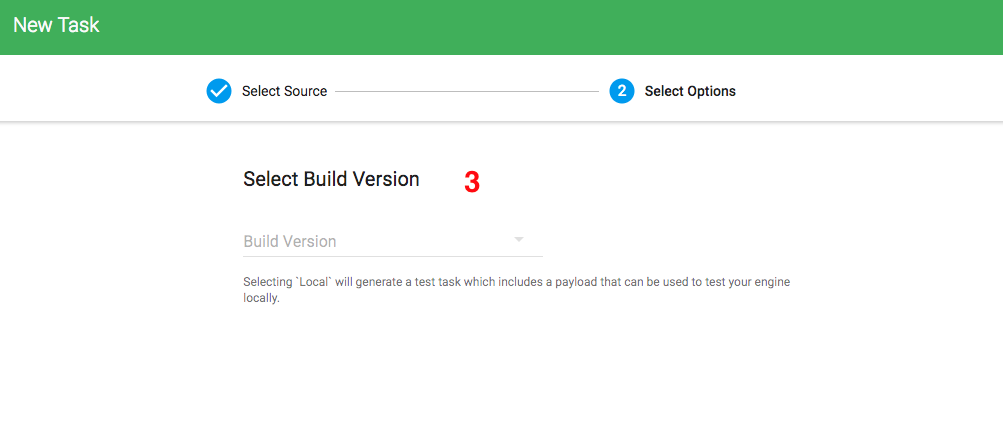
If your engine requires a library or requires any parameters then you will also have the option to input them on this page.
Once you are done click on submit. You will then be redirected back to the tasks page where you will see the new test task in the tasks table.
- Expand the task by clicking on the row. You may notice that the payload is not yet available and instead you're met with a message and a retry spinner. This is normal; there are several tasks running in the background that need to finish in order to generate a payload for you to consume. This normally takes a few minutes but varies depending on the size of the media file that you have chosen to process.
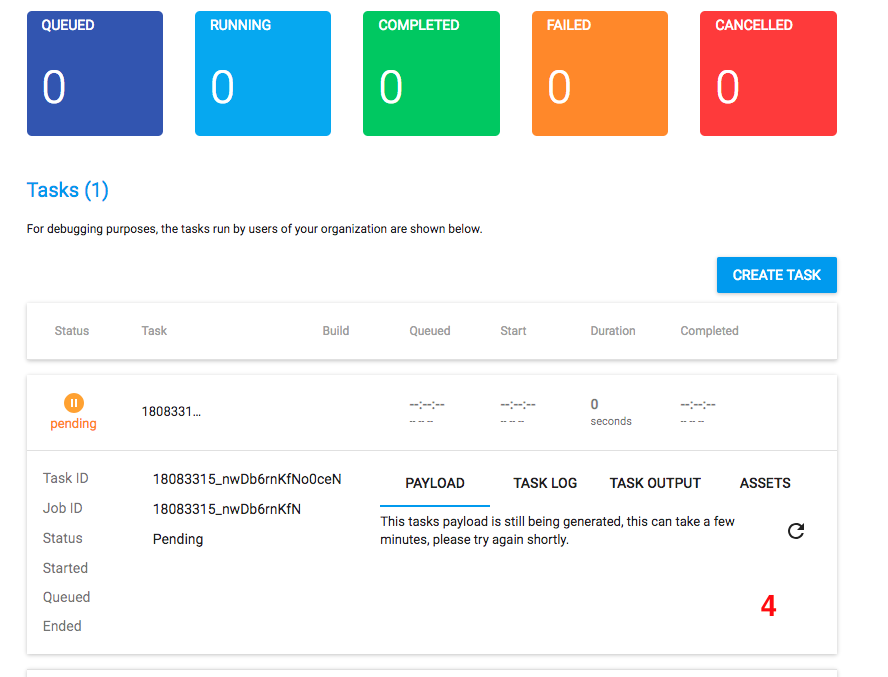
Once your payload is available it will look similar to the example below.
Example payload:
{
  "jobId": "18083209_n3kEqWG6ON",
  "taskId": "18083209_n3kEqWG6ONnL9lj",
  "token": "eyJhbGciOiJIUzI1NiIsInR5cCI6IkpXVCJ9.eyJzdWIiOiIxMjM0NTY3ODkwIiwibmFtZSI6IkpvaG4gRG9lIiwiaWF0IjoxNTE2MjM5MDIyfQ.SflKxwRJSMeKKF2QT4fwpMeJf36POk6yJV_adQssw5c",
  "recordingId": "400017204",
  "taskPayload": {
    "language": "en-us"
  },
  "veritoneApiBaseUrl": "https://api.veritone.com"
}
- Now that you have generated a valid payload, copy and save its contents into a
.json file on your computer.
As mentioned previously, when this type of engine is deployed to Veritone a PAYLOAD_FILE environment variable is passed to it at runtime which contains the location of the payload file it needs to process.
You can simulate this by creating an environment variable locally called PAYLOAD_FILE and setting it's value to the file path of the file you have just created. Once you have done that, you can now run your engine locally using a valid payload in order to test your engine end to end to ensure it behaves correctly.
Creating Test Tasks via API (Optional)
Once you have created the initial test payload, you may optionally prefer to create additional test tasks via curl rather than going through the GUI every time. Below is a curl snippet you can copy and modify to do so. Be sure to replace engineId with the id of your engine, as well as the targetId with the recording id of the payload from the original test task.
[Note] If your engine requires custom fields or a library, you will need to update the mutation below to include those.
  curl -X POST \
  https://api.veritone.com/v3/graphql \
  -H 'authorization: Bearer <insert your bearer token goes here>' \
  -H 'content-type: application/json' \
  -d '{"query":"mutation{createJob(input:{targetId:\"<the recordingId>\" tasks:[{engineId:\"<your engineId>\" testTask:true}]}){id}}"}'
Testing in aiWARE
Before submitting your build, we also recommend testing it on our platform. To do this you should follow the same steps listed for testing your engine locally, except that you should now choose the build version that correlates to your uploaded build when asked to select a build on the select options page. This will create a job that will be processed in the aiWARE platform by your uploaded build, instead of creating a test task as is the case when you select Local as your build version.

