Use Data Center to import, organize, and process your data, including audio, video, images, and text. You can run cognitive engines against your files, and view the generated results.
[Note]If your organization has enabled aiWARE's Object Level Permissions feature, those may be configured to limit what actions users can perform in Data Center. For example, not all users may be allowed to create new folders, or move files between folders. See Manage Object Level Permissions for more information.
Access Data Center
To open Data Center, click the utility logo  . Select the Data Center folder icon
  . The Data Center panel slides out.
Import a new file
To access your data and use it in aiWARE, import it to Data Center. Then you can organize it into folders for easy access.
Steps
-
Click New > File Import. The Local Machine Importer uploader opens.
[Tip]For a list of all currently supported file types, click View Supported File Formats to open the Supported File Types panel.
-
Click Browse Files, select up to 100 files from your computer, then click Open. A progress indicator displays next to each file as it is loaded for importing.
-
(Optional) In the Location Folder section, click Change, select a different folder to import the files to, or create a new folder for them, then click Choose Location.
[Tip]Navigate to the folder of your choice within Data Center and click the New button to automatically select that folder location during import.
-
(Optional). Click Manage Permissions and enter one or more permission groups to set access controls for the files. This feature requires that Object Level Permissions have been turned on for your organization. For more information about the feature and how to specify groups, see Manage Object Level Permissions.
-
Once all files have successfully loaded, do one of the following:
-
(Recommended) To make it easier to locate files as your content grows, modify the file metadata, tags, and thumbnail. See Edit file metadata.
-
If you want to import the files without editing their file details, click the Import button to launch the importing process.
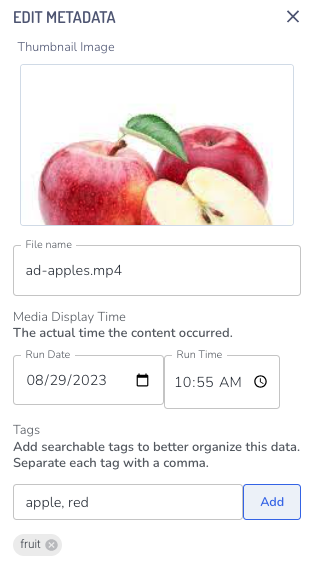
Edit file metadata
After you select your files, you can refine the file information to help you track, identify, and search for them. This is important as your Data Center library grows. For example, a large media corporation with many sources and files would have a hard time locating a single file without some guideposts like naming conventions, tags, folders, and dates to keep track of it all.
Steps
-
To edit a file, click the pencil icon  . This opens the Edit Metadata panel. Editing the details of your files helps you search and organize them as your content grows.
-
Thumbnail image: A thumbnail image represents what’s in the file. Pick one that helps you identify the content.
-
File name: Select a file name that describes what’s in the file.
-
Media display time: For video and audio files, entering the date and time the content aired or was created (rather than the date and time it was added to Data Center) helps during search.
-
Tags: These markers help you organize and search in your files. Include as many helpful tags as you want separated with a comma. Alternatively, you can enter a tag name and click Add after each one. Tags appear as a gray pill when applied.
-
Click Save Changes.
-
When you're ready to import the files, click Import.
Move files
The file location defaults to the folder you're in when you upload the file, unless you specified a different folder. Data Center allows you to move your files to an existing folder, and to create new folders to organize them.
[Note]For organizations that have Object Level Permissions (OLP) enabled, moving files may be restricted depending on the user's permissions.
Steps
-
To move files, click the three dots icon  to the right of the file
and select Move. The Choose a Location panel opens.
-
Select an existing folder using the navigation links at the top, or click the add folder icon  to create one. After you’ve picked the location, click Choose Location.

