AUTOMATE STUDIO USER GUIDE
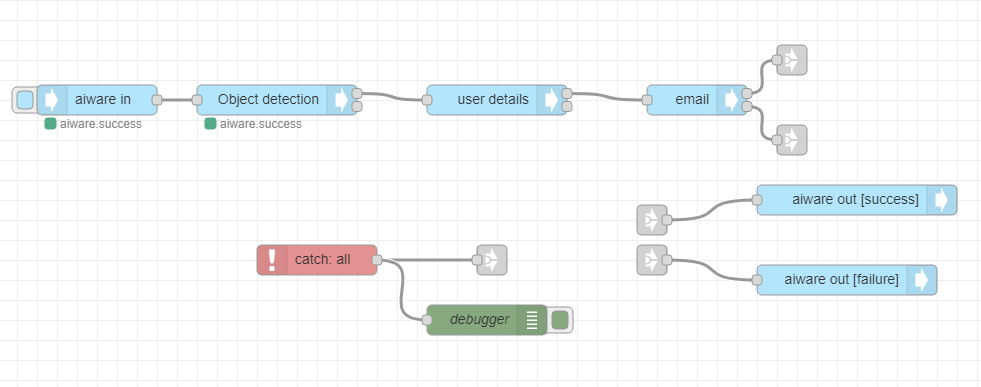
This tutorial describes how to create a transcription flow that transcribes a video using the object detection engine. This flow receives a video URL, runs it through an object detection engine, and creates an annotated version of the file. The annotation link is emailed to the user.
Step 1: Log in to Automate Studio
- Log in to automate.veritone.com.
- Click + New flow. Give the flow a name. The palette window appears.
Step 2: Set the aiware in node
- Drag the aiware in node to the canvas area. Double-click the node to open the node properties. Make the following changes:
- To save and close the properties, click Done.
Step 3: Set the cognition node
In this step, you'll configure the core cognition node that detects objects in the video.
- Drag the cognition core node and drop it next to the aiware in node. To wire the two nodes, drag a wire from the output connector of one node to the input of the other node.
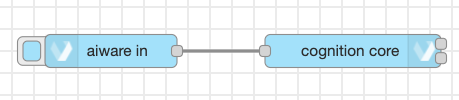
- Double-click the cognition-core node to open its properties. Make the following changes:
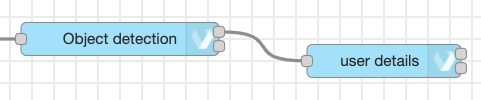
- In the name field, type "Object detection."
- In the Category dropdown, select the Object Detection.
- From the Engine dropdown, select Machinebox - Tagbox.
- In Advanced Settings, in the Cluster option, ensure prd5 - Adhoc Cluster is selected.
- To give the job a high priority, select Job Priority > Very High.
- Check the Wait for results checkbox. This pauses the flow and proceeds to the next node only when the job is done and the results are generated.
- Click Done.
Step 4: Set the user details node
This step sets the user details to send the email.
- Drag the user details node (under "aiWARE tools") and drop it next to the cognition core node.
The cognition core node has two outputs. The upper grey square on the right side of the node represents the success output. The grey square below represents the failure or error output.
- Wire the success output from the cognition core node to the input port of the user details node.
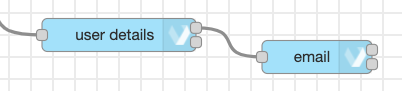
The user details node doesn't require special settings. It accepts a username and password as inputs in the node's properties. If not provided, it uses the user details of the logged-in user by default.
- View user details in the msg object under .payload.aiware.user. The logged-in user email is available under the name property in msg.payload.aiware.user. The full path to the logged-in user email is msg.payload.aiware.user.name.
Step 5: Set the email node
- Drag the email node (under "aiWARE Common") and drop it next to the user details node.
- Wire the success output from the user details node to the aiware email node.
- Double-click the email node to open the node properties. Make the following changes:
- To Email: Click the dropdown and select msg. The node looks for the email in the msg object In the To Email box, paste the following path: payload.aiware.user.name.
- Email Subject: Click the dropdown and select string. The node takes the value provided in the box as a string. Paste 'Automate Hello World Object Detection' in the box.
- Email Body: Click the dropdown and select expression. Use the expression type to provide values from the msg object to the email body directly in the node.
- Click the horizontal menu (three dots) on the right edge of the box. Paste the following expression:
"Hello, <br>Welcome to Veritone and Automate Studio! <br><br> Here is your annotated file: https://cms.veritone.com/#/media-details/" & payload.aiware.tdoId
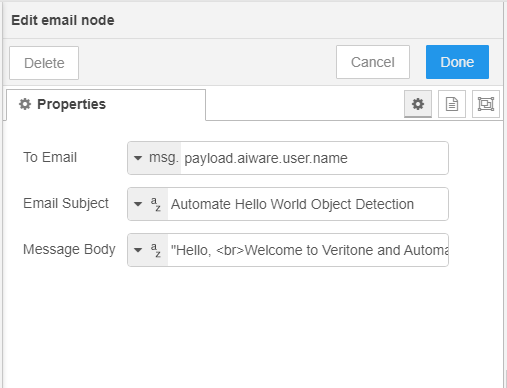
Everything between two 'Ampersands' is taken as a path in the msg object.
- To close the editor, click Done. To close the node properties and save the changes, click Done again.
Step 6: Add output nodes
This step adds output nodes to the flow: one for success and one for failure.
- Drag the aiware out node and drop it to the canvas next to the email node.
- Click aiware out to select it. Press Control + C and Control + V to copy and paste the node. Now there are two output nodes: one for success and one for failure.
- Move one of the two identical aiware out nodes down a little bit.
- Wire these nodes to the upper and the lower ports.
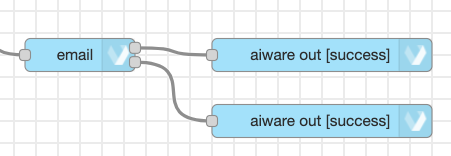
- Configure the upper and lower nodes so that the upper node is for success and lower node is for failure.
- Double-click on a node.
- From the Output Status dropdown, select success or failure - success for the upper node and failure for the lower node. Click Done to close the properties.
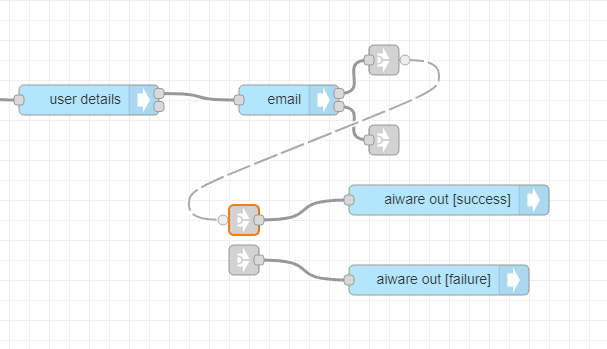
- Drag a link in node (from under "common") and put it in front of the aiware out [success] node, and wire it to its port. Repeat for the aiware out [failure] node.
- Drag two link out nodes and put them in front of the email node. Wire both ports to these.
- Connect the outputs of the link out nodes to the link in nodes as shown below. Notice the long wire becomes dashed, and when the node is unselected the wire becomes invisible, which keeps the flow from being visually cluttered. To see if the wires are there, click once on the input or output nodes.
Step 7: Error handling and debugging
This step configures the flow to catch errors and help debug errors.
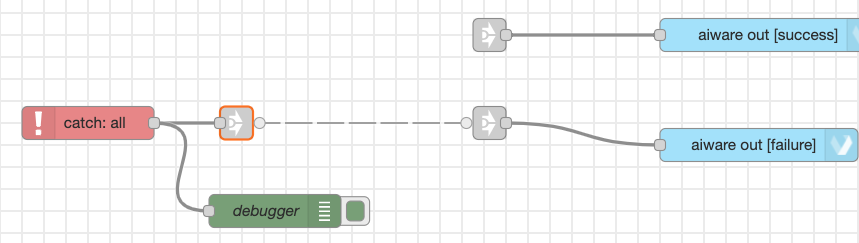
- Drag a catch and a link out node to the palette below the existing nodes. Wire the link out node to the catch node output.
- Add a debug node below the catch node, and wire the catch node output to the debug node port.
- Set up the debug node properties as follows:
- From the Output list, select the Complete msg object option
- Rename the node to "debugger" in the Name box.
- Click Done to close the node properties and save the changes.
- Wire the catch node to the aiware out [failure] node using the link out node. The flow should look like:
Step 8: Run the flow
- To run the flow, check the blue box to the left of the aiware in node. Follow the job progress and debug the node from the Debug window by clicking the bug icon on the sidebar.
The flow completes in a few minutes and the results are sent to your email.

