AUTOMATE STUDIO USER GUIDE
This tutorial describes how to create a flow that analyzes the sentiment of social streams, emails, and text messages. When a post or a message falls below a certain sentiment threshold, the flow sends an email notification so that the issue can be escalated and addressed.
Step 1: Log in to Automate Studio
- Log in to automate.veritone.com.
- Click + New flow. Give the flow a name. The palette window appears.
Step 2: Set the aiware in node
- Drag an aiware in node to the canvas. Double-click the node to open the node properties.
- Click the Output format dropdown menu, and select the Simple option.
Step 3: Set up the Manually Inject Data area
- Click the Sample Input dropdown and select the Default option. Optionally, you can select an existing sample input or create a new one.
- In the Edit JSON tab, paste the following JSON object:
      {
          "url": "http://s3.us-east-1.amazonaws.com/static.veritone.com/assets/negative.txt",
          "callbackUrl": "https://abc.com/", // for training purposes, you can create a free online http post bin and provide the URL here.
          "threshold": "0.5"
      }
- Click Done to close the node properties and save the changes.
After the flow is triggered, the JSON is available in msg.payload.aiwareChunk.
Step 4: Set the first Function node
- Drag the Function node and drop it next to the Input node.
- Wire up the two nodes. The Function node stores some data in the flow variable. The flow variable is available to all nodes in the flow and isn't overridden by changes made on the msg object.
- Double-click the Function node to open the node properties and rename it to "Set context."
- Copy the below code and paste it in the Function node. This code stores the callbackUrl and threshold variables to the flow variable.
let callbackUrl = msg.payload.aiwareChunk.callbackUrl;

let threshold = msg.payload.aiwareChunk.threshold;

flow.set('callbackUrl', callbackUrl);

flow.set('threshold', threshold);

return msg;
- Click Done to close the node properties and save the changes.
Step 5: Set the cognition node
- Drag the cognition core node and drop it next to the function node. Once done, wire up the two nodes.
- Double-click on the cognition core node to open the node properties. In node properties, change the following:
- Rename the node to Sentiment job.
- From Category, select Sentiment. From the Engine dropdown, select Sentiment - G V3.
- In the Advanced Settings, from the Cluster option select the prd5 - Adhoc Cluster.
- Give the Job a high priority by selecting the Very High option from the Job Priority dropdown.-
- Check Wait for results. This pauses the flow and proceeds to the next node only when the job is done and the results are generated.
- Click Done to close the node properties and save the settings.
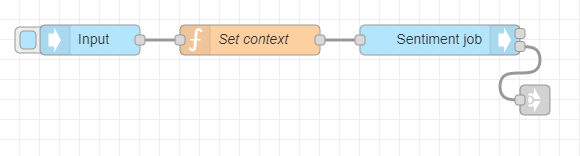
- Drag a link out node and place it just below the Cognition node.
- Wire the error output from the Cognition node to the link out node. The flow should look like this:
Step 6: Set the user details node
- Drag the User Details node from the Node Palette and drop it next to the previous node.
The previous node is the Cognition - Core node, which has two outputs. The upper grey square on the right side of the node represents the Success output. The grey square below represents the Failure or Error output.
- Wire the Success output from the Cognition - Core node to the input port of the User details node.
The User Details node doesn't require special settings. It accepts Username and Password as inputs in the node's properties. If not provided it will get the user details of the logged-in user by default.
- View the user details in the msg object under .payload.aiware.user. The logged-in user email is available under the name property in
msg.payload.aiware.user. The full path to the logged-in user email is msg.payload.aiware.user.name. - Add a link out node and wire it to the error output of the User Details node.
Step 7: Set the email node
- Drag the email node to the canvas.
- Wire the success output from the User Details node to the aiware email node.
- Double-click on the email node to open the node properties. Set up the properties in the following way:
- To Email: Click the Input Type dropdown and select the msg. type. The node will look for the email in the msg object. In the box, paste the following path: payload.aiware.user.name.
- Email Subject: Click the Input Type dropdown and select the string type. This means that node takes the actual value provided in the box as a string. In the box, paste 'Notification: Escalation of negative feedback from customer'.
- Email Body: Click Input Type and select the expression type. Using the expression type you can provide values from the msg object to your email body directly in the node. Click the horizontal menu button (three dots) on the right edge of the Input.
Paste the following expression:
"Hello, <br>Welcome to Veritone and Automate Studio! <br><br> Here are your results:" & payload.aiware.tdoId & "<br><br> Basic Engine Output: "&"<br>Positive value:"& payload.aiware.engineResult.sentiment.positiveValue &"<br>Negative value:"& payload.aiware.engineResult.sentiment.negativeValue
- Click Done to close the node properties and save the changes.
- Add a link out node and wire it to the success output of the aiware email node.
- Add another link out node and wire it to the error output of the aiware email node.
The flow should be similar to:

Step 8: Set the second Function node
- Drag the Function node and drop it below the Input node.
- Add a link in node and wire it to the Function node port. Then wire the link out node which is wired to the success output of the aiware email node to the link in node you have just added.
- Double-click on the Function node to open the node properties and rename it to "Prepare callback data." You'll add some javascript code to analyze the Sentiment result from the Cognition node. If the overall input text is negative, which means that the sentiment negative value is higher than the provided threshold, then you'll prepare an http post to inform about the issue by sending it to the provided callbackUrl. Otherwise, the flow stops running and sends a success notification to AI Processing.
- Copy the below code and paste it in the Function node. This code stores the callbackUrl and threshold variables to the flow variable.
msg.headers = {};

msg.headers['Content-Type'] = 'application/json'

let callbackUrl = flow.get('callbackUrl')

let threshold = flow.get('threshold')

let postId = Math.random().toString().substring(3,23)

msg.sentiment = msg.payload.aiware.engineResult.sentiment;

if(msg.sentiment.negativeValue > threshold)
    msg.isNegative = true
else
    msg.isNegative = false


if( msg.isNegative ){

    msg.url = callbackUrl

    msg.payload = {
        "postId": postId,
        "positiveValue": msg.sentiment.positiveValue * 100,
        "negativeValue": msg.sentiment.negativeValue * 100,
        "isNegative": msg.isNegative
    }

    return [null, msg];

} else {

    return [msg, null];

}
[Note] When an array is returned from the function node, as shown here, make sure to create the same number of node outputs as the number of the elements in the returned array. The first element in the output will be returned from the upper node output and so on respectively. Add outputs by setting the Outputs field to a higher number.
- Click Done to close the node properties and save the changes.
- Add a link out node and wire it to the upper output of the Function node.
Step 9: Set the http request node
- Drag the http node node over and wire the success output from the Function node to the http node port.
- Double-click the node to open the node properties and make these changes:
- Set the Method to POST. The URL box will remain empty. This is because we provide the URL via msg.url. In case this field is left empty, the node will take the mentioned value as the URL for the http request.
- Check the Enable connection keep-alive box.
- Set the Return option to UTF-8 string.
- Set the node name to "Send response to customer service."
- Click Done to close the node properties and save the changes.
Step 10: Add output nodes, error handler, and debugger
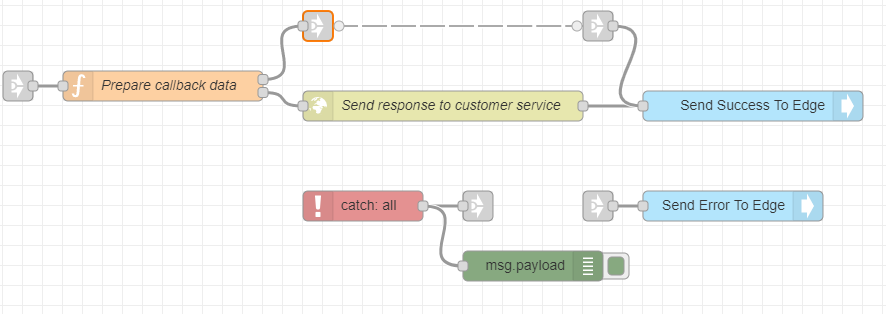
- Add output nodes to the flow - one for success, and the other for failure.
- Add two aiware out nodes, a catch node and a debug node, and wire up everything like in the image below. Ensure you add the link nodes.

- Rename the first aiware out to "Send Success To AI Processing," and the output status to "Success."
- Rename the second aiware out node to "Send Error To AI Processing," and the output status to "Failure."
- Wire the link out from the Function node to the link in of the Send Success To AI Processing.
- Wire up the link out nodes for error output from the Cognition node, the user details and the aiware email node to the link in node for the Send Error to AI Processing node.
- Open the Debug (msg) node properties and set the output to complete msg object. This will help us debug any potential error caught by the catch node.
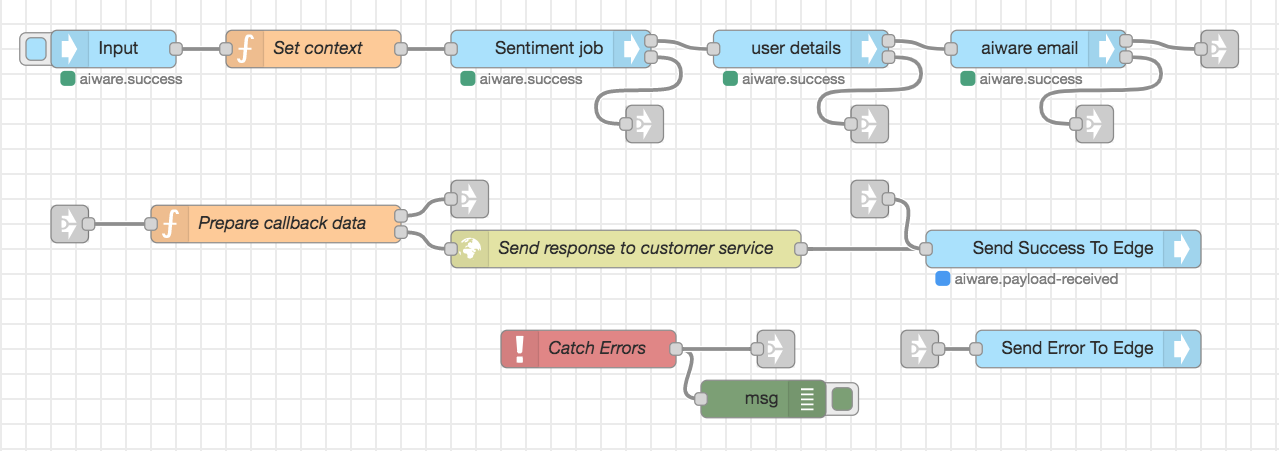
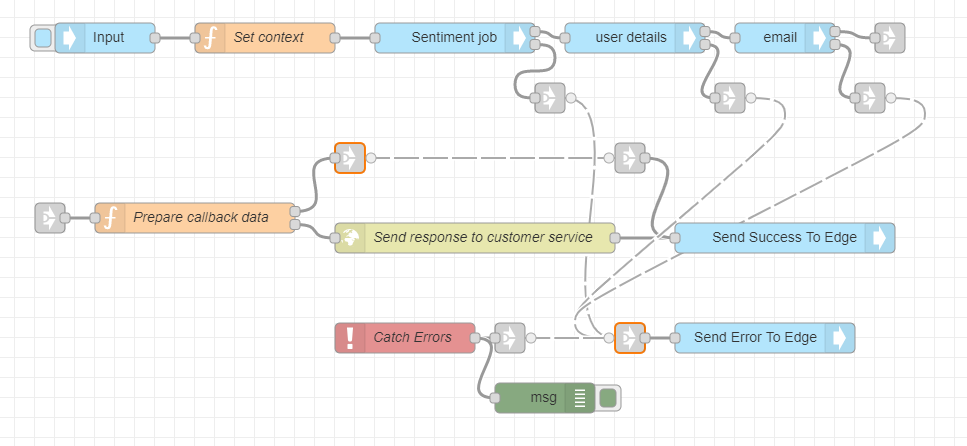
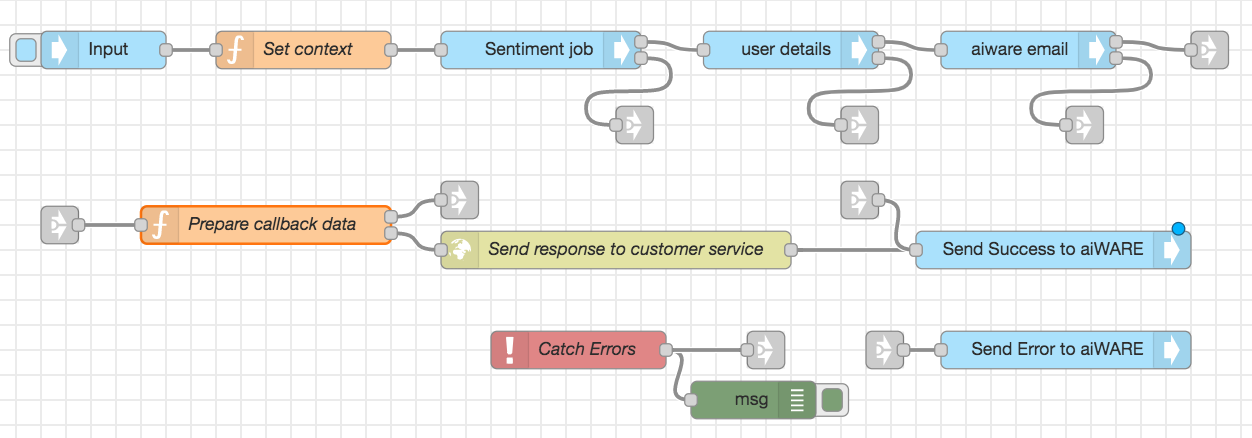
Below is the full flow with the link nodes selected. Verify that your flow looks the same.
Step 11: Run the flow
The flow looks like this:
- To run the flow, check the blue box to the left of the aiware in node.
- To follow the job progress and debug the node from the Debug window, click the bug icon in the sidebar.
In a few minutes, the flow completes and the result is sent to the email you signed up with. If you provided a valid callbackUrl, then you'll receive a post request and can view it in your endpoint.