You can use the Okta identity and access management cloud service as an OpenID Connect (OIDC) Provider for authentication to enhance the login and security features of the aiWARE OS. This is typically used for on-premises implementations, but you can also use this to connect to any aiWARE SaaS platform.
OpenID Connect is an authentication protocol built on OAuth 2.0 that you can use to securely sign in a user to an application.
You can configure the Okta identity and access management cloud service as an OpenID Connect (OIDC) Provider for authentication, or you can set up a SCIM v2.0 client to handle user identity lifecycle management (LCM) against SaaS and on-prem aiWARE installations.
These steps apply to any Okta instance servicing the OpenID Connect Provider role.
[Note] If you decide to implement OIDC directly through the Okta platform, Okta may require an additional license for LCM when acting as a SCIM client. Check with your Okta representative to confirm if your implementation supports LCM.
Create an Okta OpenID Connect application integration
Perform the following steps within your Okta Admin Console.
[Note] aiWARE does not provide a templated application integration in the public Okta Integration Network Catalog.
- In the Okta Admin Console, go to Applications > Applications.
- Select Create App Integration.
- For the sign-in method, select OIDC - OpenID Connect.
- For Application Type, choose Web Application.
- Click Next.
- In the "General Settings" section of your Okta Admin console, provide the following information:
- In the "Trusted Origins" section, the Base URIs is typically left blank.
- In the "Assignments" section, provide the following information:
- Controlled access: select Skip group assignment for now. This will be completed in a later step.
- Click Save.
The app integration is created, and the settings page opens to configure additional options.
- On the General tab, note the following important information:
- Client Credentials: Lists the Client ID and Client Secret used to register the Okta Application integration to an aiWARE Org.
- General Settings: Lists the Okta domain used to define the OktaDomain variable in the aiWARE configuration step later.
- On the same tab, in the General Settings section, click Edit.
- Under the Login section, copy the Sign-in redirect URI and paste it into the Initiate Login URI field.
- Click Save to complete the configuration.
In the Sign On tab, under Open ID Connect Token and Issuer, change the issuer url from "dynamic" to "Okta url."
Click Save.
To configure your aiWARE organization to use an Okta OpenID connection for authentication, you need at least one user with the Admin role in your aiWARE organization. The Admin role is required to link the aiWARE Organization to the OpenID Connect Provider. For more information about adding admins and users, see Administrators and organizations.
For these steps, you need the Client ID, Client Secret, and Okta Domain values noted in the General tab from the Configure Initial Application Integration Settings steps above.
- Access the Admin Center utility by logging in to your aiWARE administrative account. In the header bar, select the utility icon
 and then Admin Center
  .
.
Admin Center slides out as a panel. - Click IAM in the left navigation panel.
The Identity and Access Management panel appears. - Click Add New to open the Log In Connector wizard. Fill out the Provider Configuration options:
- Name - Enter a name for the connection
- (Optional) Description - Enter a description for the connection
- (Optional) Website URL - Enter the value for the Okta Domain noted above
- Client ID - Enter the Client ID value noted above
- Client Secret - Enter the Client Secret value noted above
- Issuer URL - Enter the value for the Okta Domain noted above
- Click Next.
- Fill out the Button Design options. These represent the login button users see when logging into aiWARE, once connected.
- Button Text Label - Descriptive title seen at login screen. This must always start with "Login with…".
- (Optional) Button Logo
- (Optional) Customize the color and text color of your button.
- Click Create. A new OIDC Provider section appears on the screen with a Callback URL.
- Click Copy Callback URI and switch back to the Okta Admin Console to finish Application integration.
These steps are performed in the Okta Admin console and utilize the newly defined aiWARE callback URI to link the Okta Application Integration.
- Select Application > Application.
- Select the Application Integration previously created.
- Under General > General Settings, select Edit.
- Paste the Callback URI from the prior step into the following values:
- Sign-in redirect URIs
- Initiate login URIs
- Click Save.
The link between aiWARE and the Okta OpenID Connect Provider is complete.
Create Users and Groups and assign to the Okta Application Integration
This section covers the creation of Okta users, groups, and assignment to the Application Integration. Optional methods to populate the Okta directory include Just in Time (JIT) provisioning or Directory integration. See Okta's documentation for details.
General notes:
- You use groups to assign Okta Application Integrations and for various SCIM actions. You must name groups using a prefix of aiware_, and we also recommend you use naming conventions that reflect the application role the group will have. For example, to access aiWARE Illuminate in an editor role, the group should be named
aiware_illuminate_editor. - You can assign multiple groups to a single Application Integration, and users can be members of multiple groups based on the application roles they’re allowed.
Create a group
- In the Okta Admin Console, go to Directory > Groups.
- Select Add Group.
- Provide the following information:
Create a user
User creation can be done manually, in the Admin console, or with Just In Time (JIT) processing. Refer to your Okta documentation for properly using JIT provisioning.
- In the Okta Admin Console, go to Directory > People.
- Select Add Person.
- Select User as the default User Type.
- Complete these minimum fields:
- First name: Enter the user's first name.
- Last name: Enter the user's last name.
- Username: Enter the user's user name in email format.
[Note] Usernames must match those used within the aiWARE instance. Emails within aiWARE must be unique across an entire instance, not just across aiWARE orgs. Use of email aliases (i.e. + values) is recommended when multiple email identities need to be tied to a single email.
- Groups: Enter the group or groups created in the Create a group step.
- Password: Choose Set by user or select Set by admin.
- (Optional) Send user activation now: Select Save or select Save and Add Another to add another user.
Assign Okta Application
You can assign Okta Applications at the application or user/group level. Multiple groups may be assigned to a single application based on the role the group will represent.
- In the Okta Admin Console, select Applications > Applications.
- In the Search field, enter the name of the application.
- Select the application name and select the Assignments tab.
- Select Assign and select Assign to Groups.
- Click the group you want to assign the application to, then select Assign.
- Click Done and Go Back.
- (Optional) Repeat steps 5, 6, and 7 to assign the application to additional groups.
- Click Done.
Mapping Okta groups to aiWARE roles
Okta users can be provisioned to the aiWARE platform using SCIM. When the user is provisioned, it is possible to send the group names that the Okta user is a member, and to use those group names to associate the linked aiWARE user with aiWARE roles.
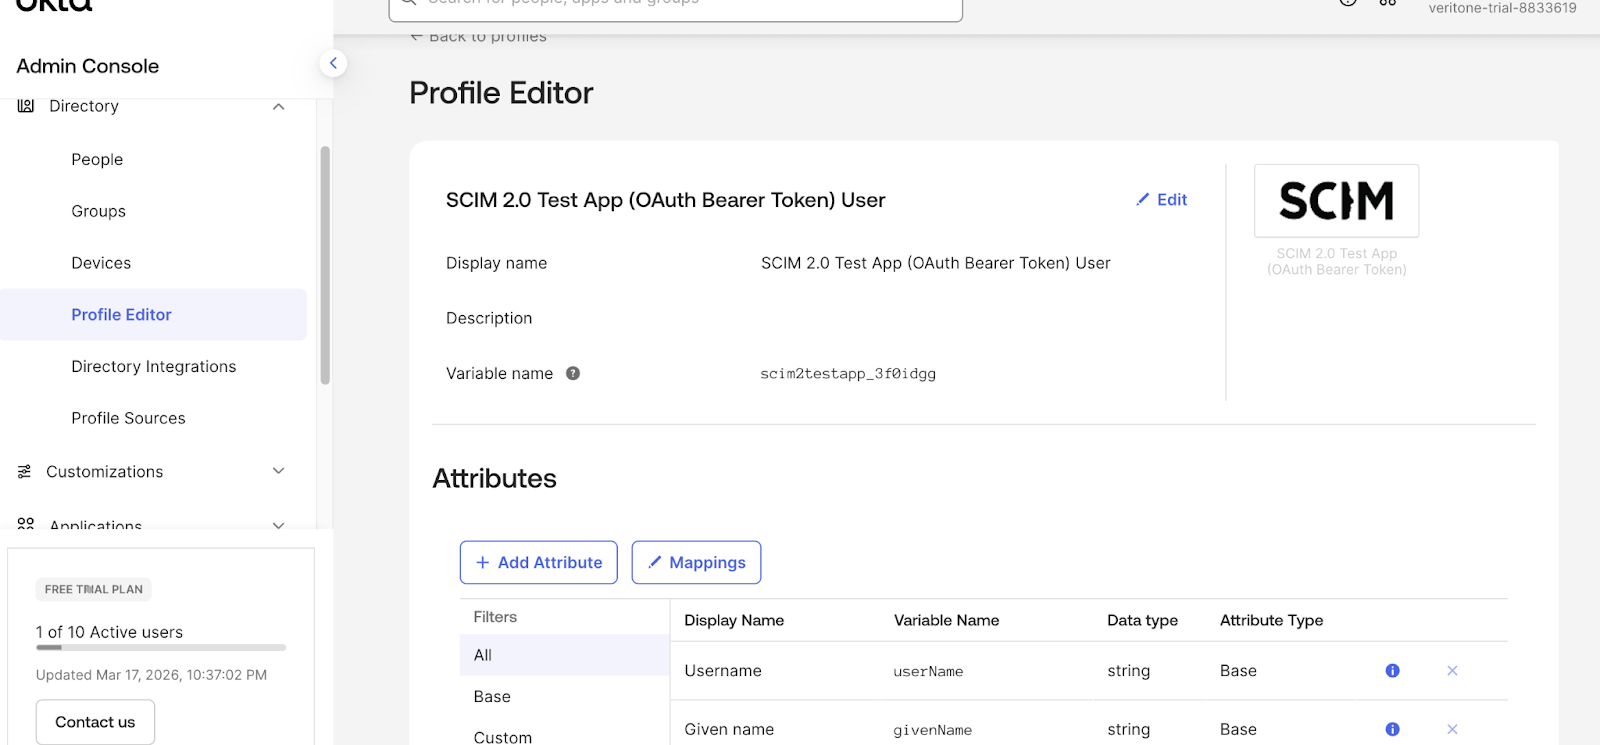
Configure SCIM Attributes and Mappings
-
In the Okta Admin Console, navigate to Applications > Applications and select the SCIM application.
-
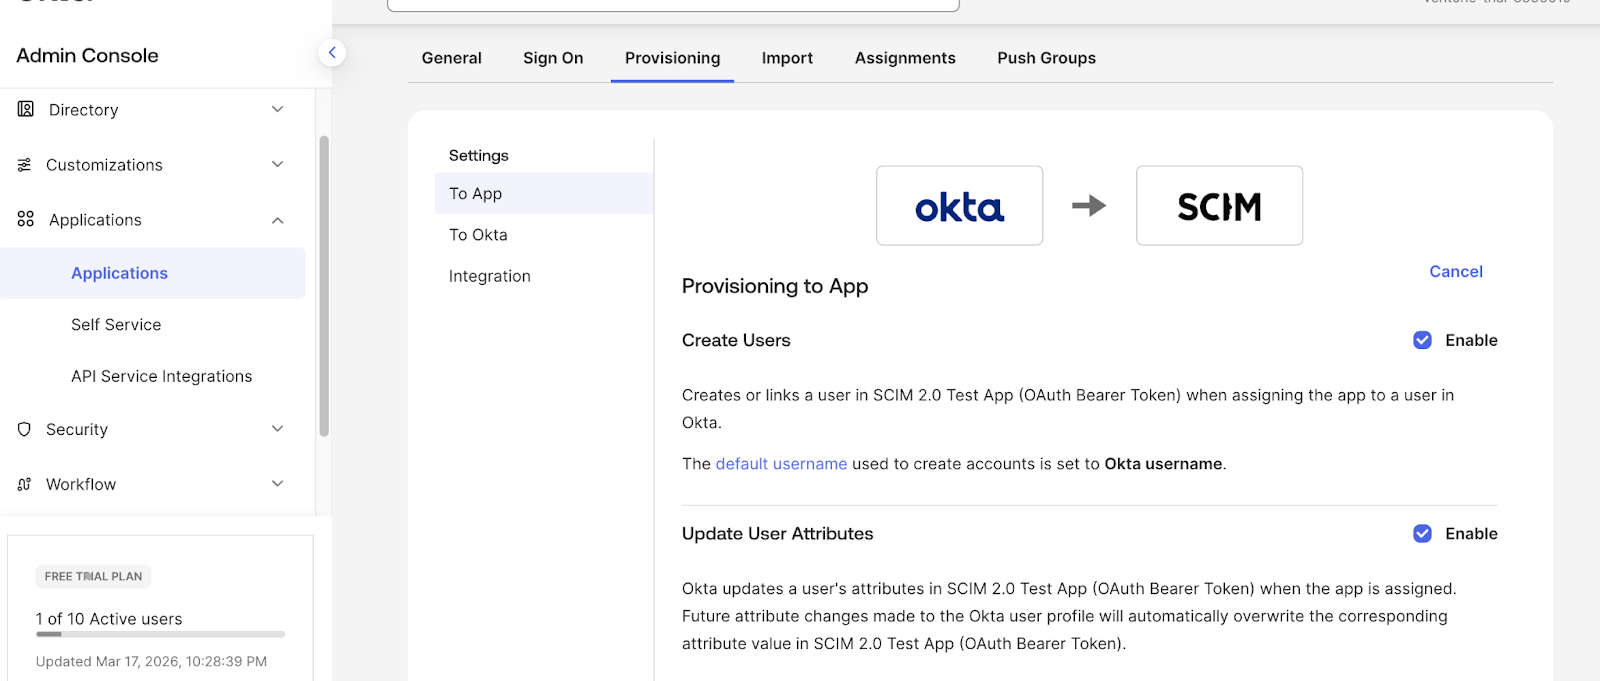
Select the Provisioning tab.
-
Select the To App under Settings in the left pane.
-
Ensure that, at least, the following properties are enabled.
-
Create User
-
Update User Attributes

-
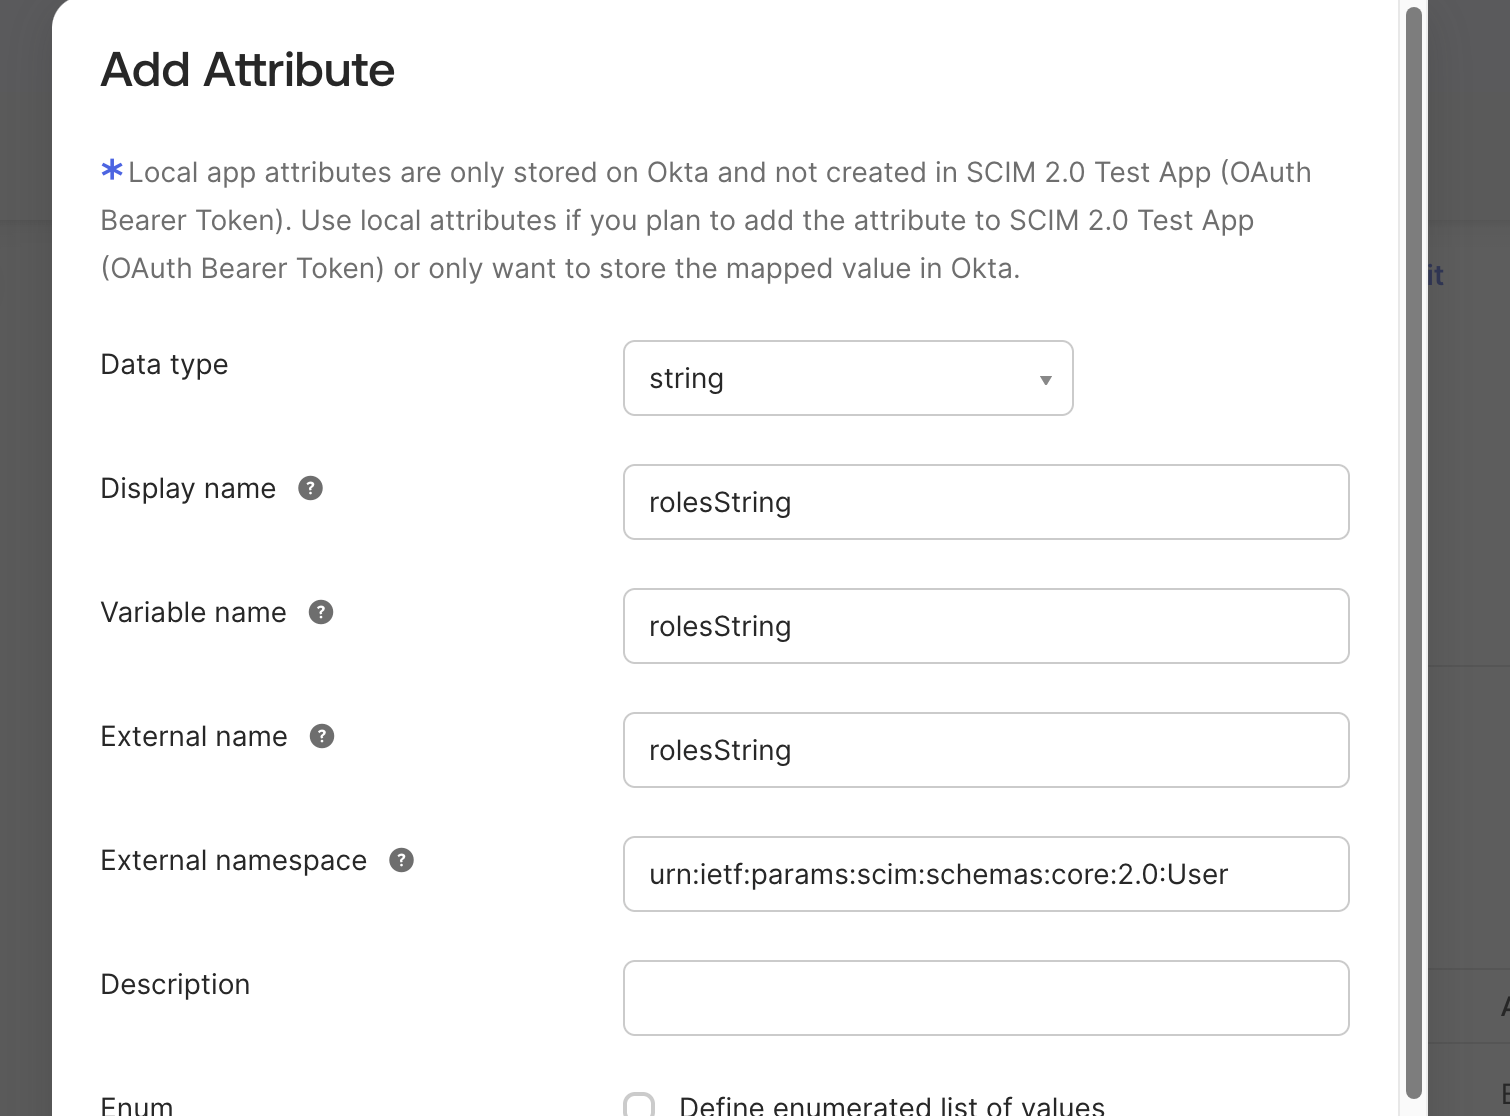
Select the Save Attribute button.
-
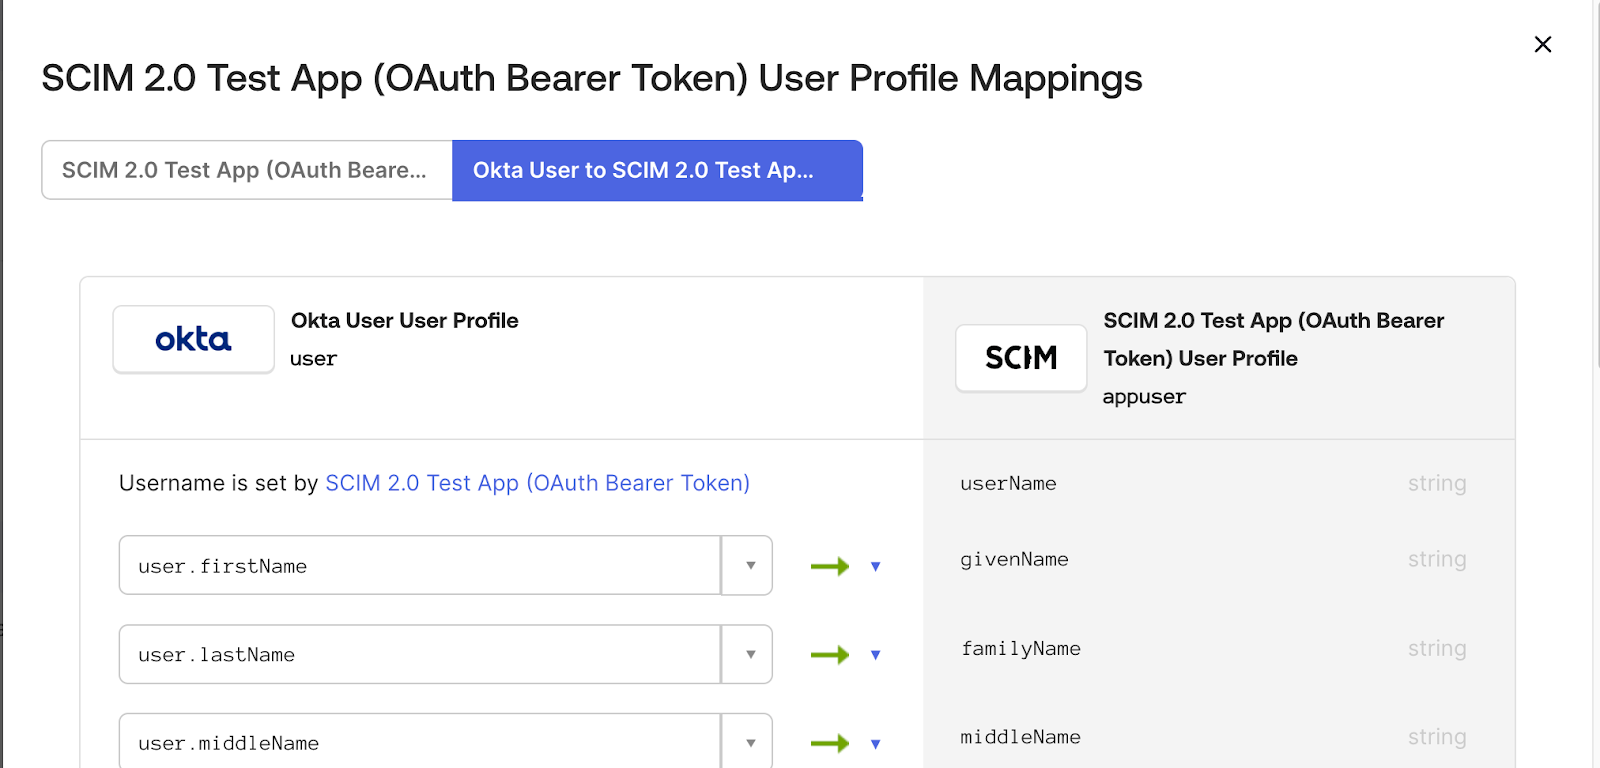
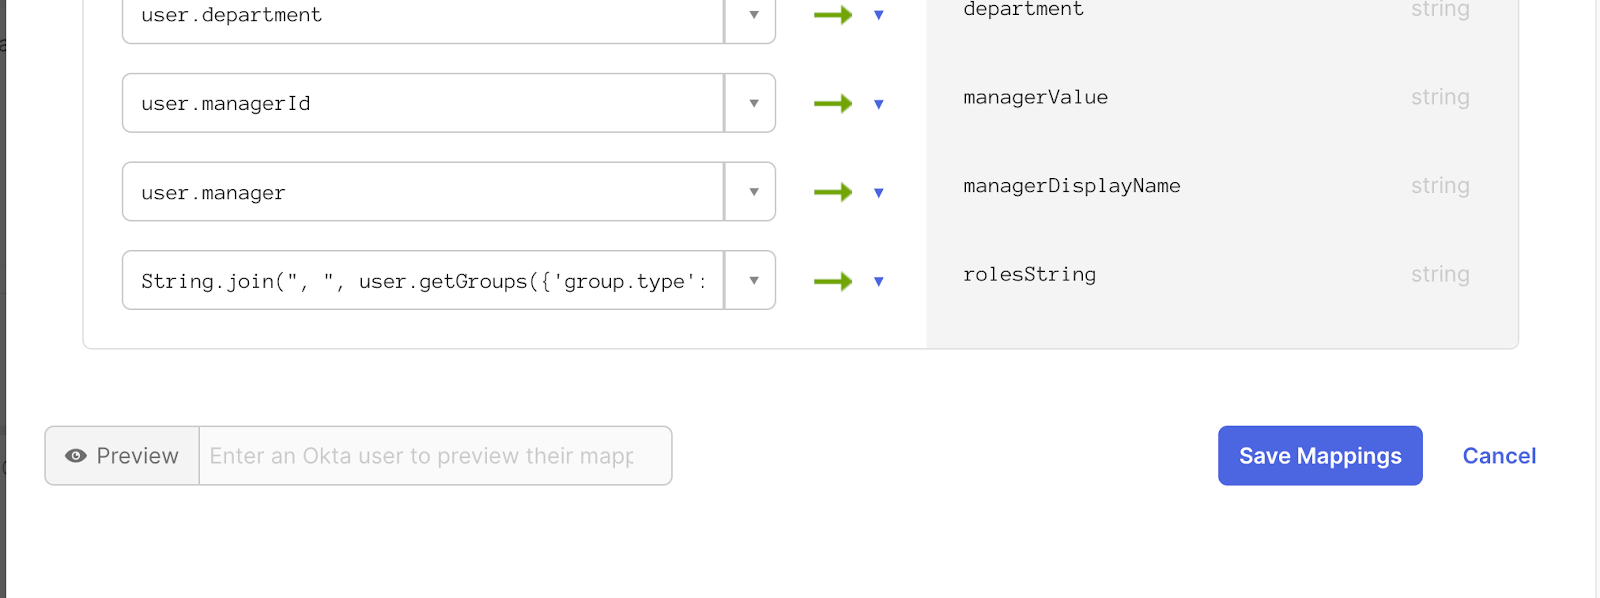
After the rolesString attribute is saved and the form window is closed, select the Mappings button.
-
In the header of the form there is a button pair. The first button will be selected (SCIM to Okta) by default. Select the second button (Okta User to SCIM). This should change the form so that Okta properties can be added to the right side and map to the SCIM application.

Identify aiWARE Application Role IDs
To create the mapping, you need the unique IDs of the aiWARE roles you want to assign.
query {

  applications(orgId: <organization-id>) {

    records {

      name

      applicationRoles {

        id

        name

      }

    }

  }

}
For demonstration purposes, assume the query response is as follows.
{

   "data": {

      "applications": {

         "records": [{

            "name": "Redact Editor",

"id": "d0136963-c244-452d-9539-d27447a60f47",

  },

         {

            "name": "Org Admin",

"id": "513796b3-4a07-4138-82c5-1af675f8179f",

  },

         {

            "name": "Illuminate Editor",

"id": "52e51c27-a732-43c8-ad06-3e6fe3cfd14d",

  },

         {

            "name": "Illuminate Admin",

"id": "d3f1de76-747d-4a18-b520-620725073c69",

  },

   {

            "name": "Track Admin",

"id": "c362fcd2-38bd-4e0e-bee7-7e2eb1e985c5",

   }]

      }

   }

}
Create the Role Mapping Link
You must now link the Okta group name to the aiWARE Role ID.
curl --request POST \

  --url https://<domain>/api/admin/organizations/<organization-id>/openid-roles/<okta-group-name> \

  --header 'Authorization: Bearer <auth-token>' \

  --header 'Content-Type: application/json' \

  --data '{

  "roleIds": [

"d0136963-c244-452d-9539-d27447a60f47",

"513796b3-4a07-4138-82c5-1af675f8179f",

"52e51c27-a732-43c8-ad06-3e6fe3cfd14d",

"d3f1de76-747d-4a18-b520-620725073c69",

"c362fcd2-38bd-4e0e-bee7-7e2eb1e985c5"

  ],

  "applicationIds": []

}'
To make updates to the mapping, change the HTTP action to PUT instead of POST.
Verification
Once the mapping configuration is complete, Okta users can authenticate into the aiWARE desktop and observe permissions in accordance with their Okta groups.
Enable Okta to Display the aiWARE application on the User Okta Dashboard (IDP Initiated SSO Login)
When a user initiates an IdP SSO login, they may be dropped into their Okta dashboard. On the dashboard they need to be presented with an icon for the aiWARE application.
To enable this:
- In the Okta Admin Console, select Applications > Applications.
- In the Search field, enter the name of the application. Select the application name and select the Assignments tab.
- In the Self Service option on the right, select Edit.
- Under Requests, select Allow Users to Request App and select Yes.
- Under Approval, select Not Required.
- Click Save.
Remove the aiWARE Organization from using Okta OpenID Connect Authentication (Optional)
If removing the Okta OpenID Connect link is required, this must be done directly within the database. Contact Veritone support for more detail about this step.
Okta as a Service Provider
You can use the Okta platform as a Service Provider (SP) endpoint for inbound federation from your Identity Provider (IdP) using either the SAML or OIDC protocols. Utilizing JIT provisioning lets you synchronize user identity between both endpoints. The SP endpoint must still leverage a direct OIDC connection between itself and the aiWARE instance. This documentation does not cover configuration for inbound federation. Contact Veritone for coordination of platform-specific inbound federation configuration options.

