As an administrator in your organization, you can create a custom registration page for future organization users. Custom registration pages allow you to control various options and settings to customize the experience and behavior of registered users. For example, you can give your registration page your brand logos and color schemes, collect data from registered users using the custom form builder, and define the access new users receive when signing up.
To create a new registration page, you must first have an administrator role for your organization and Custom Registration must be enabled.
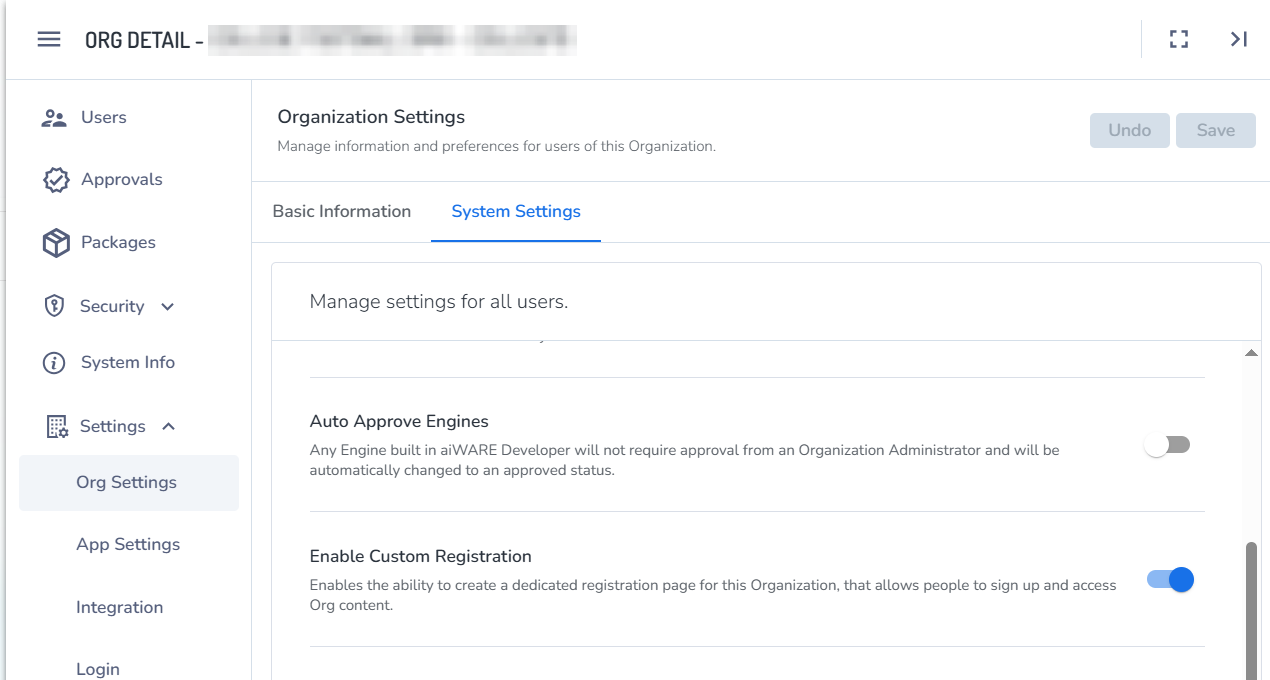
Enable Custom Registration
Check or enable Custom Registration in Instance Admin.
- To access the Instance Admin Center utility, log in to your aiWARE administrative account. You will need a superuser account, which is only available to the root organization of each instance. From the header bar, select
 and then Instance Admin Center
- Find the needed organization.
- On the left side select Settings > Org Settings > System Settings.
- Set Enable Custom Registration.
Access Admin Center
- To access the Admin Center utility, log in to your aiWARE administrative account. In the header bar, select and then Admin Center
 .
. - In Admin Center, on the left side select Settings > Registration.
- Click the Create Custom Registration button to open the creation wizard.
.png)
Add custom branding
New registration wizard step 1: Basic Info
- Registration Name: Give your registration page a new name. This will be used in your Admin Center to define the page.
- Brand Logo: The brand logo allows you to upload a custom logo that will be displayed on your registration page above the email and password fields. Please use .png or .svg image types and a resolution of 300x200 for the best performance.
- URL Slug: This slug will be appended to the registration url, and should represent the name of your Organization or company. An example of this would be signup.veritone.com/yourbrandnamehere
.png)
- Click the Next button to finish.
Add legal and privacy policies
New registration wizard step 2: Legal
Your custom terms of service and privacy policy will be exposed to users when they register. This step is optional. To skip, click the Next button.
- Terms of Service: click the Upload Terms of Service button to include a text file or PDF for your terms of service. All records of this terms of service will be stored for future audits per user.
- Privacy Policy: enter the URL where you house your privacy policy (this is not an upload).
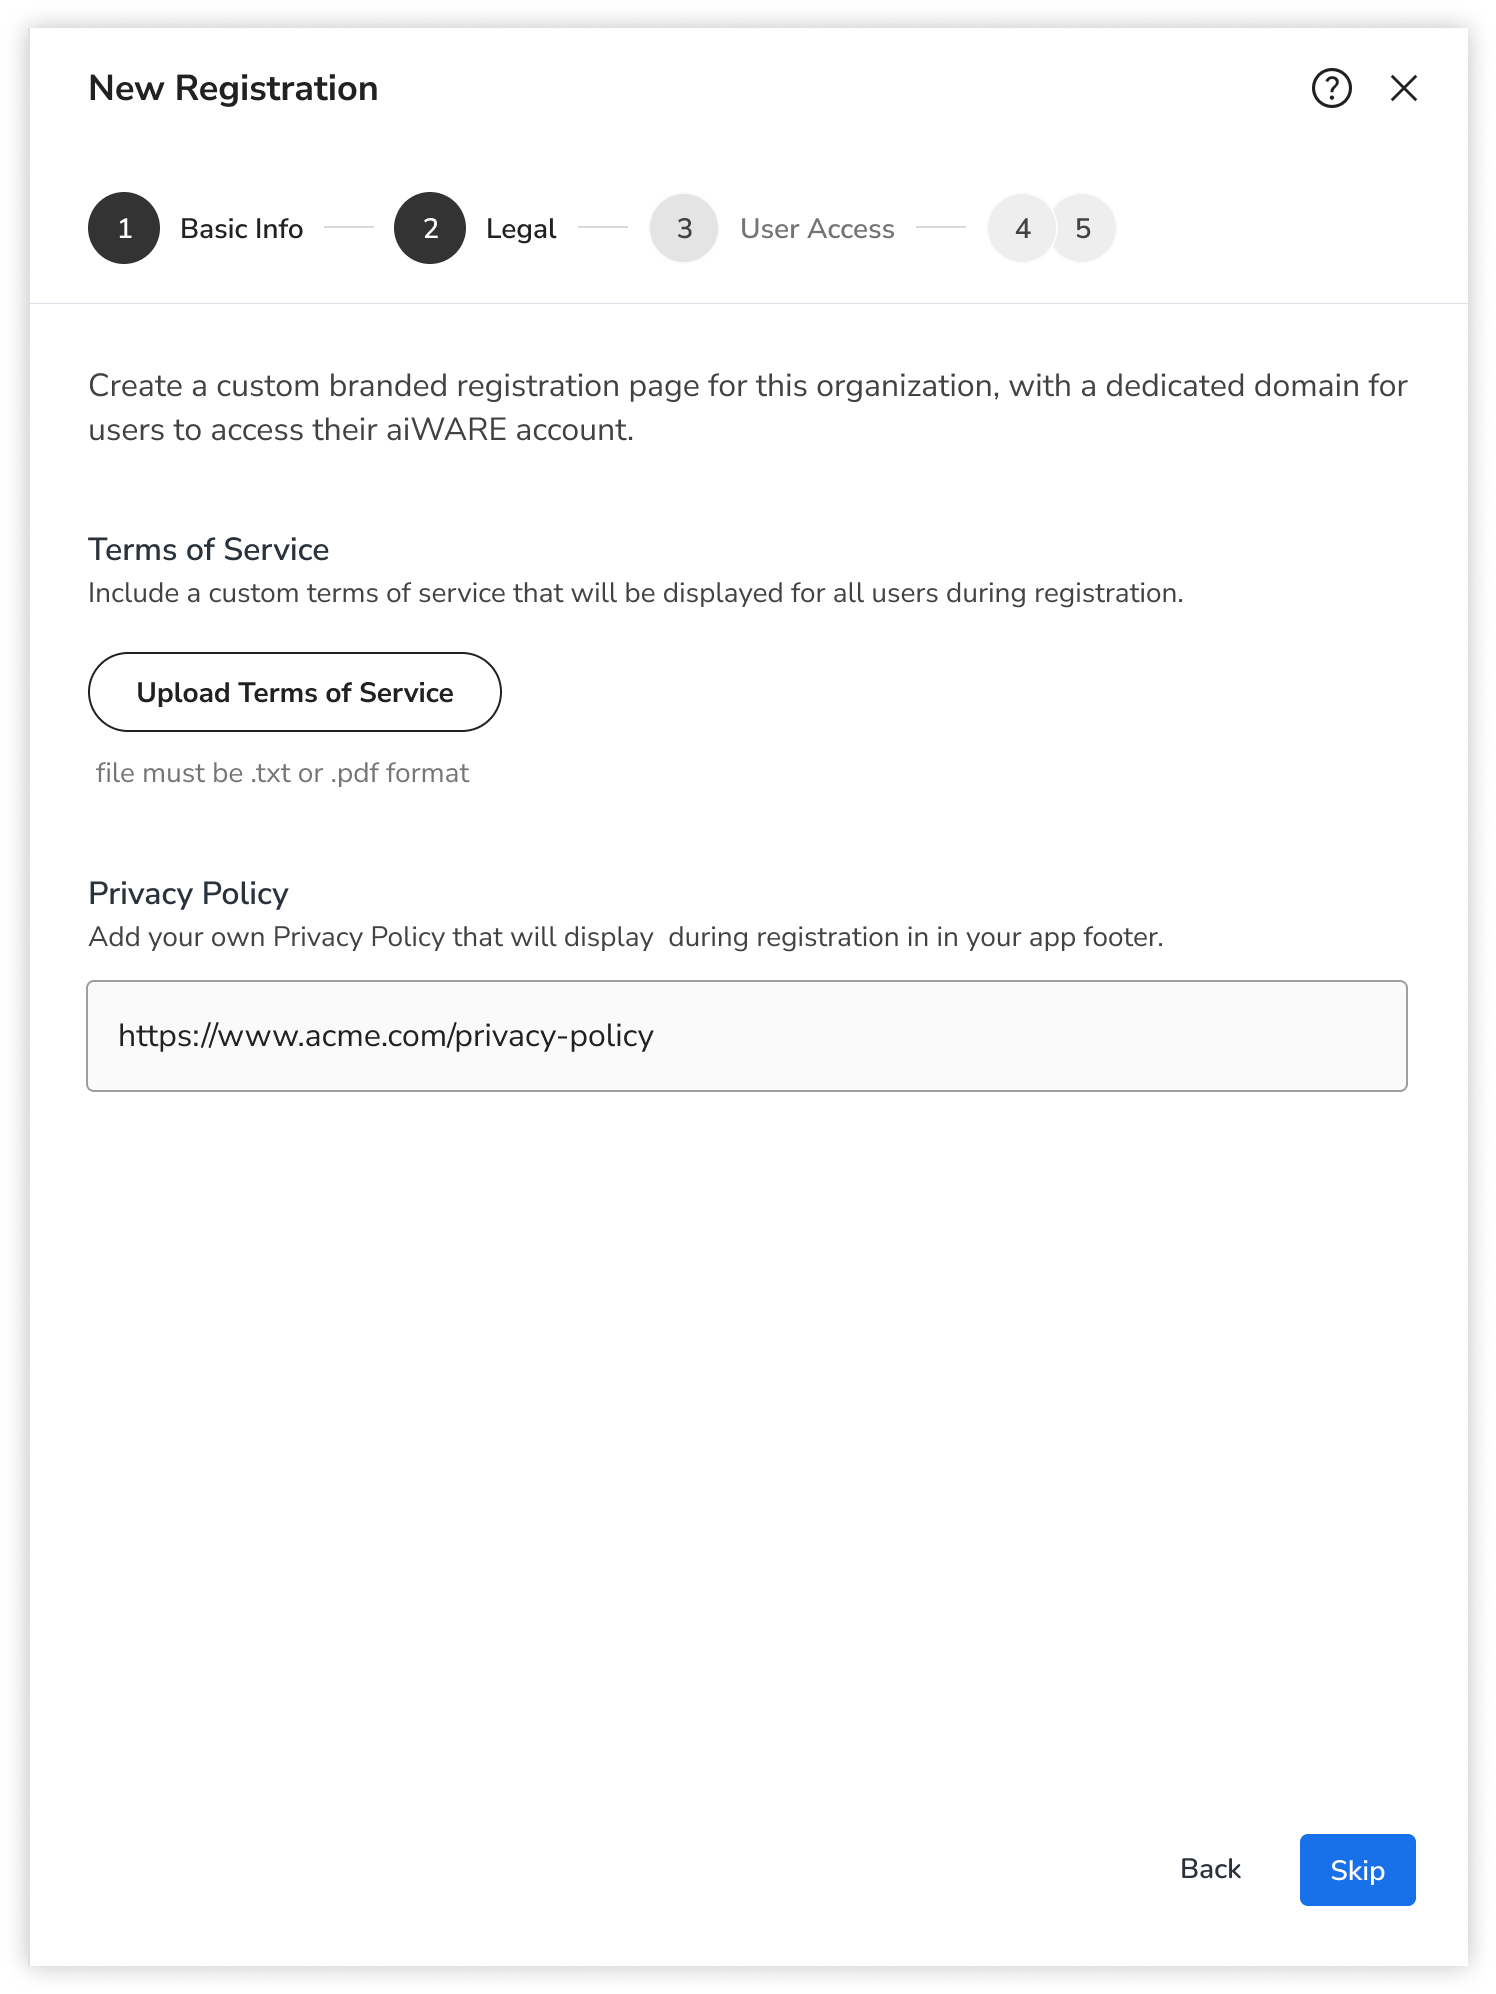
- Click the Next button to finish.
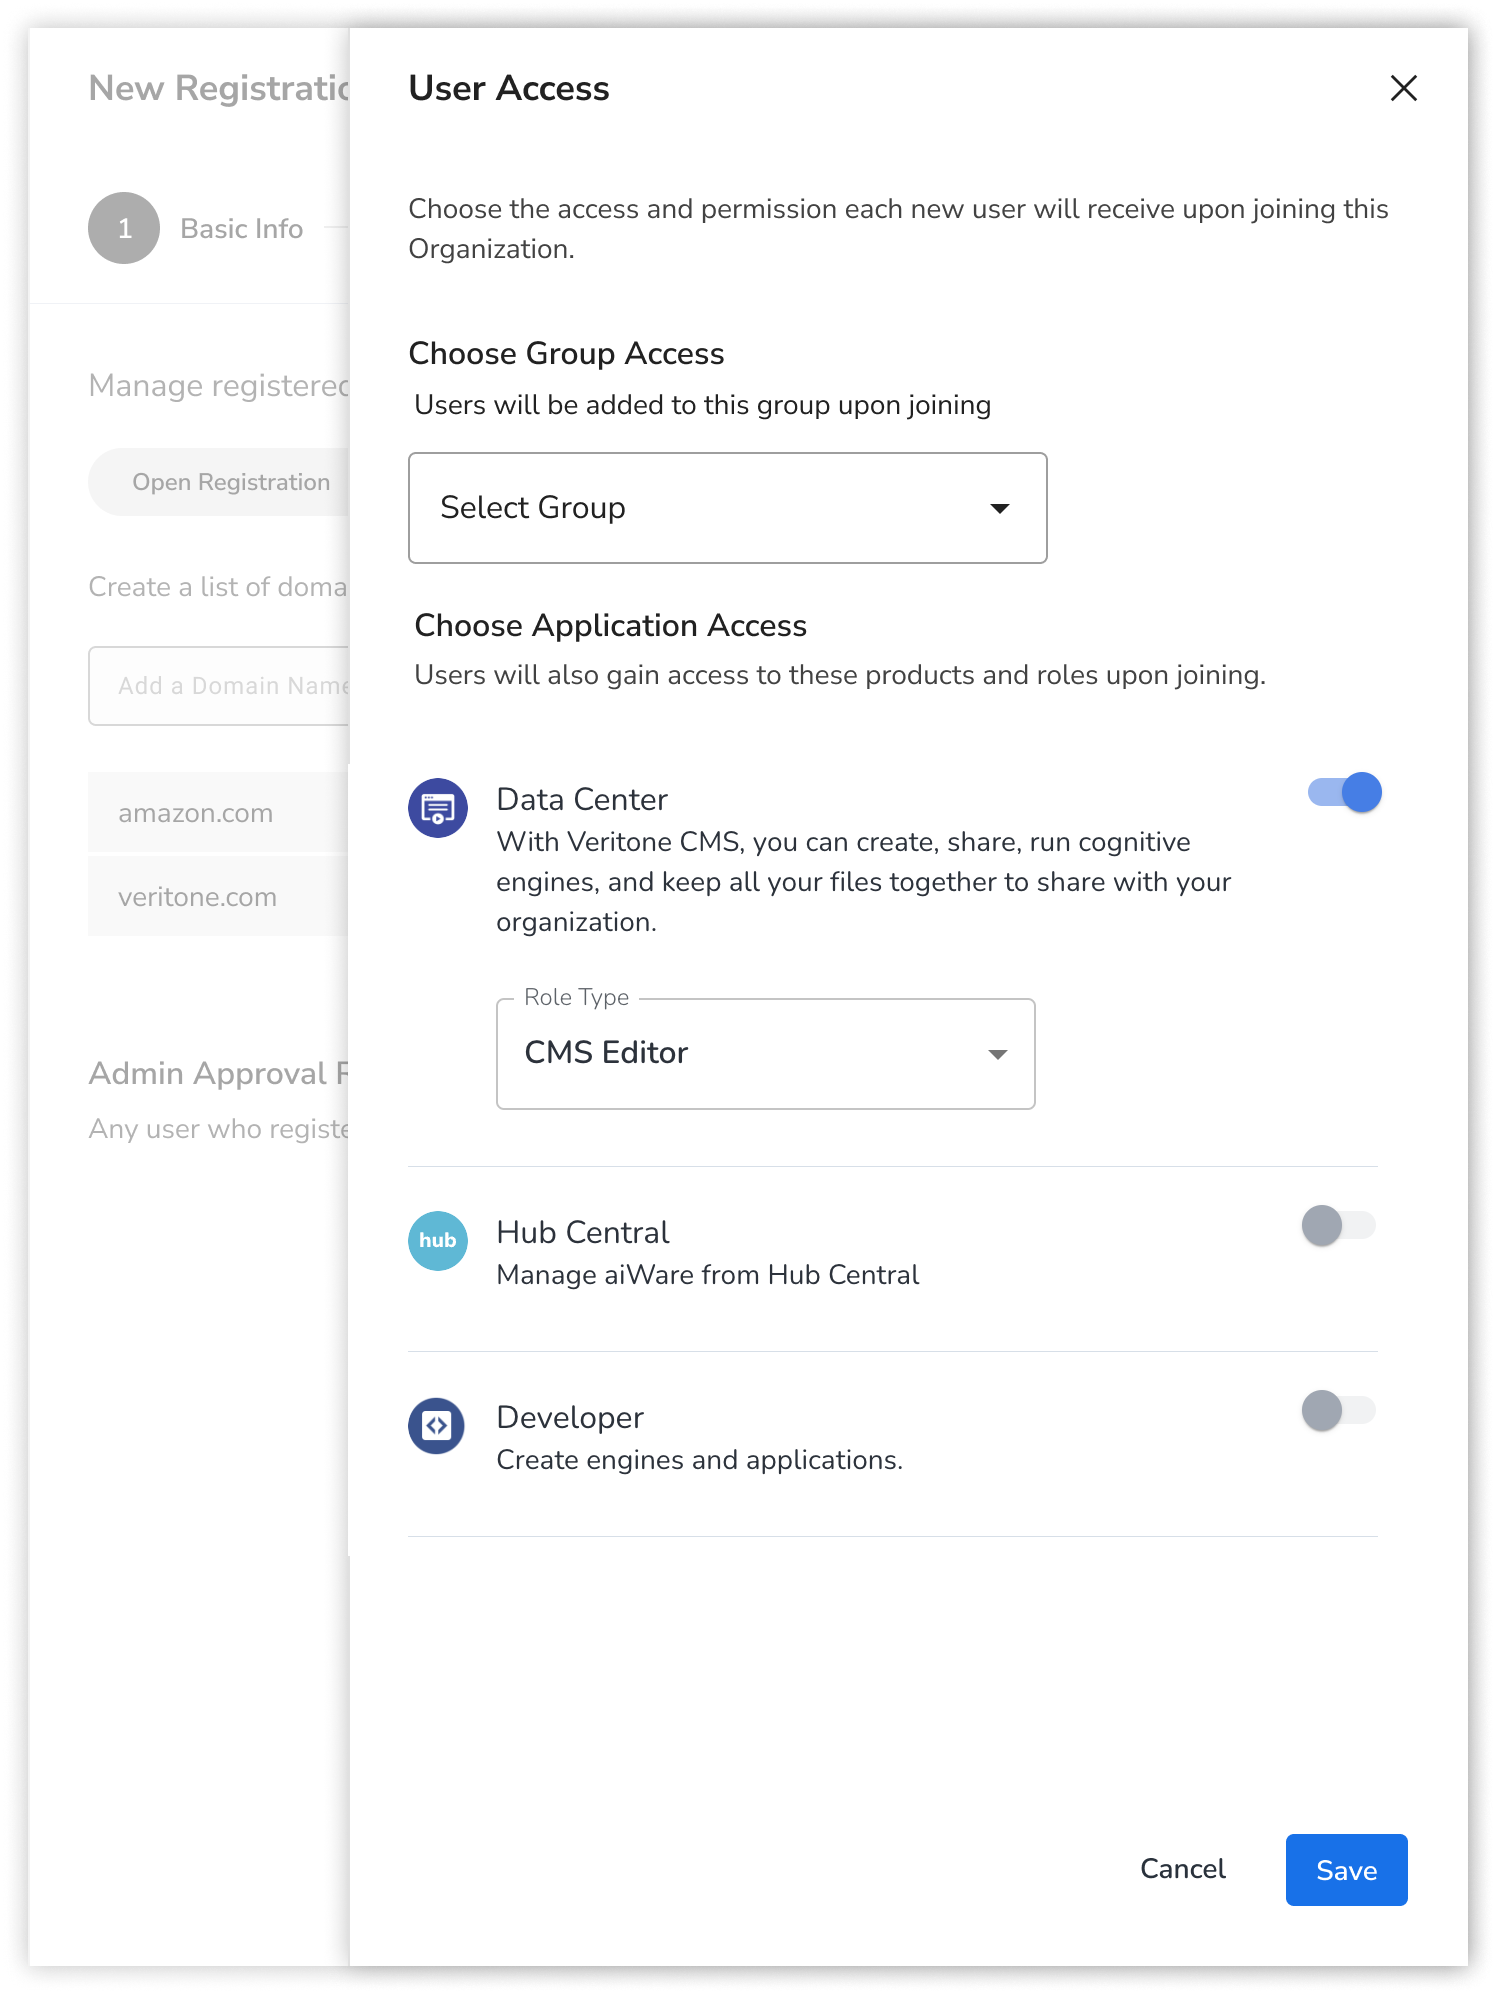
Set user access
New registration wizard step 3: User Access
Controlling the access and permissions newly registered users receive is a critical part of keeping your data safe and secure. The user access step allows you to customize who can register for your organization and what access they will receive upon signing up.
Choose:
- Open Registration: Anyone on the internet can register for your organization.
- Allowlist only: Only specific domains are allowed to register for your organization.
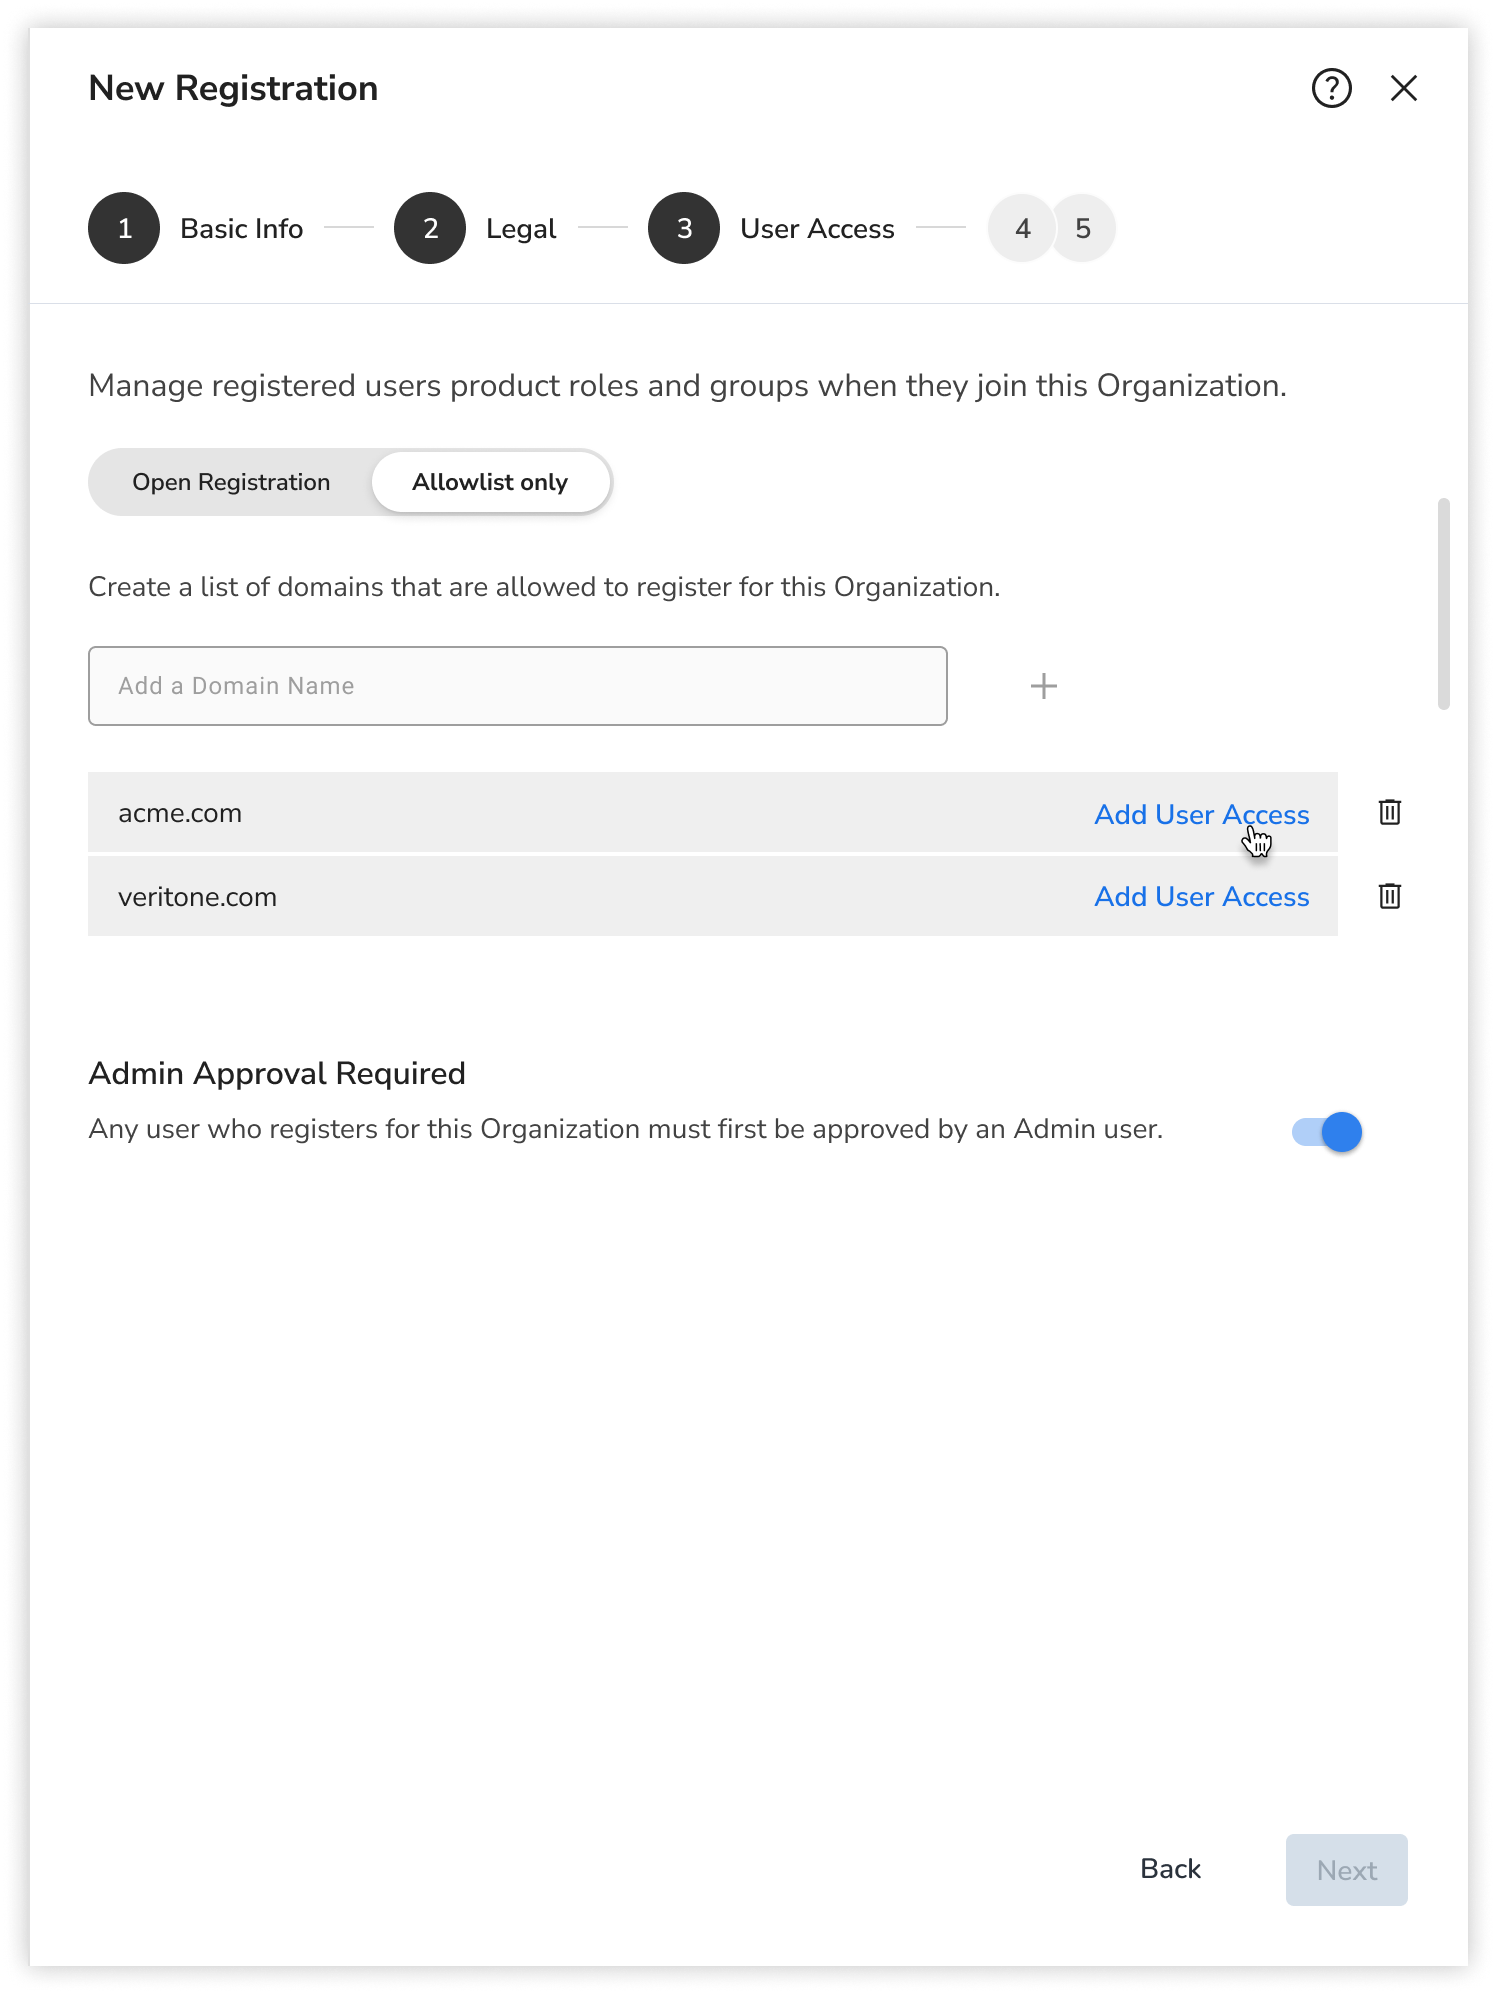
- Admin Approval Required: toggle on to add additional security you may choose to have an administrator review all incoming registration requests before the user can successfully join. Administrators will be notified of a new user request access to join the organization via email. Each request is manually approved via the approvals section of the Admin Center.
Add user access
If you choose Allowlist, you can choose the access for a user and customize the products and permissions a registered user receives upon successful registration.
Click Edit User Access. The User Access panel opens.
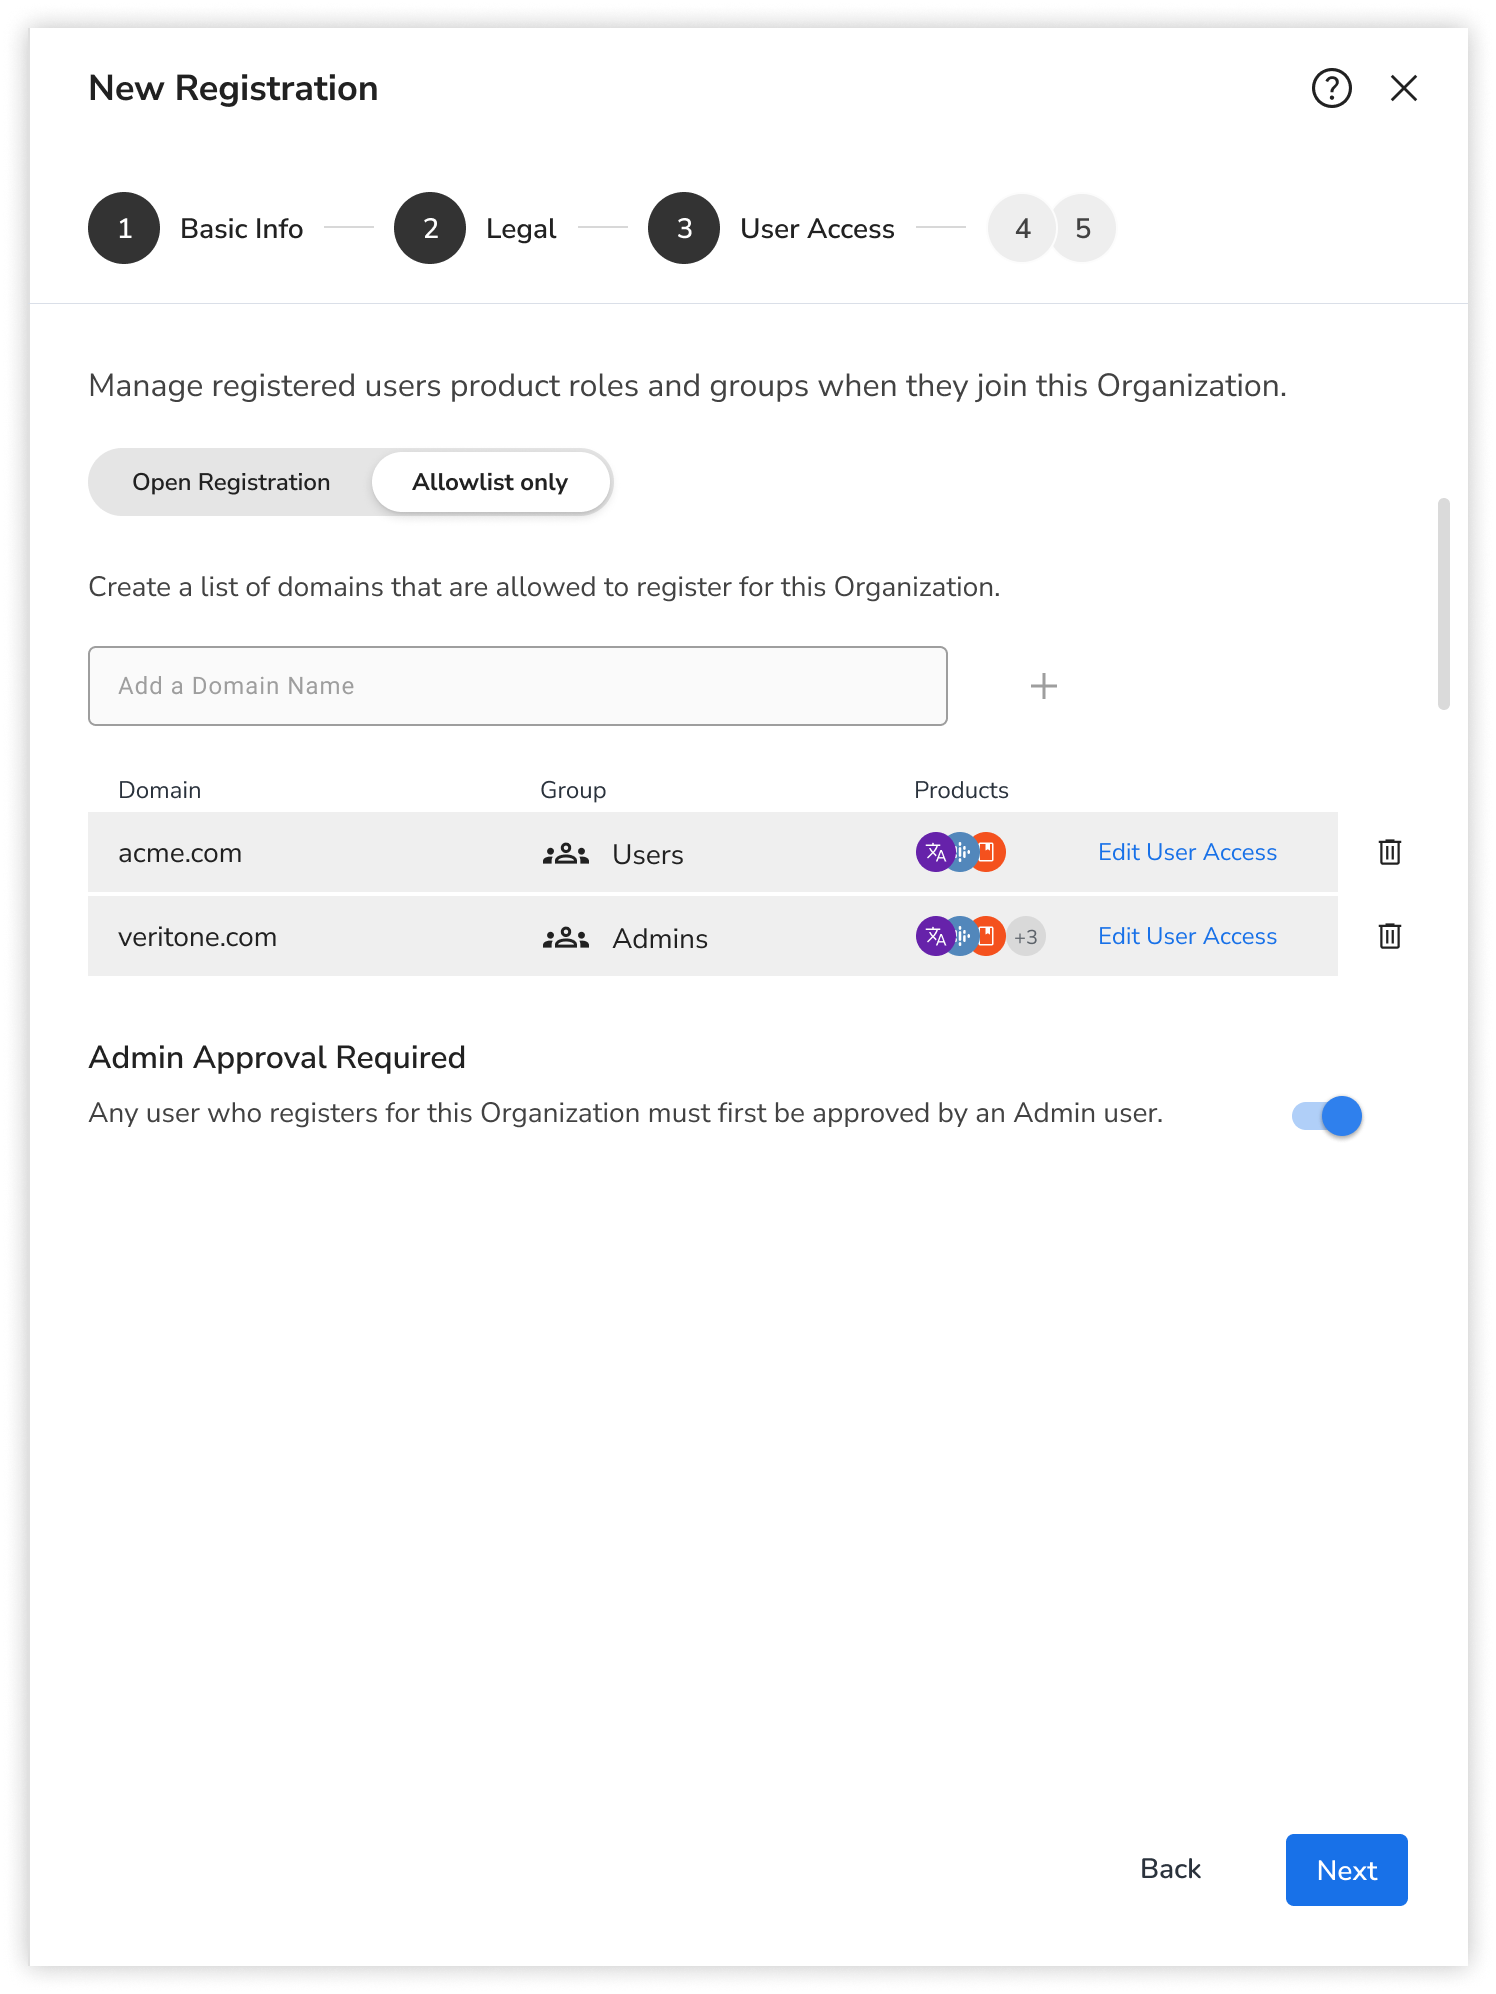
By domain:
If you select Allowlist only, each domain will need to have the access control defined for them. Upon adding each domain, select the Add User Access button on each domain row item. This will open the User Access panel. From this panel choose the products the users will receive access to by toggling on each row. Once the product is toggled on you will need to choose the role type the user will receive, which will define the permission they get to the products and services.
Optional: If your organization has Object Level Permission features enabled, you will have the option to define the group the user is added to when registering as well.
Click Save to define this per domain.
By Open Registration:
If you chose to use an open registration for your Organization, you will need to define the user access all users get upon registering. Unlike registration by domain, all users will receive the same products and permissions upon signing up.
Select the Choose User Access button to open the User Access Panel. From this panel choose the products the users will receive access to by toggling on each row. Once the product is toggled on you will need to choose the role type the user will receive, which will define the permission they get to the products and services.
Optional: If your Organization has Object Level Permission features enabled, you will have the option to define the Group the user is added to when registering as well.
Click Save to define the choices for all registered users.
Click the Next button to continue to step 4.
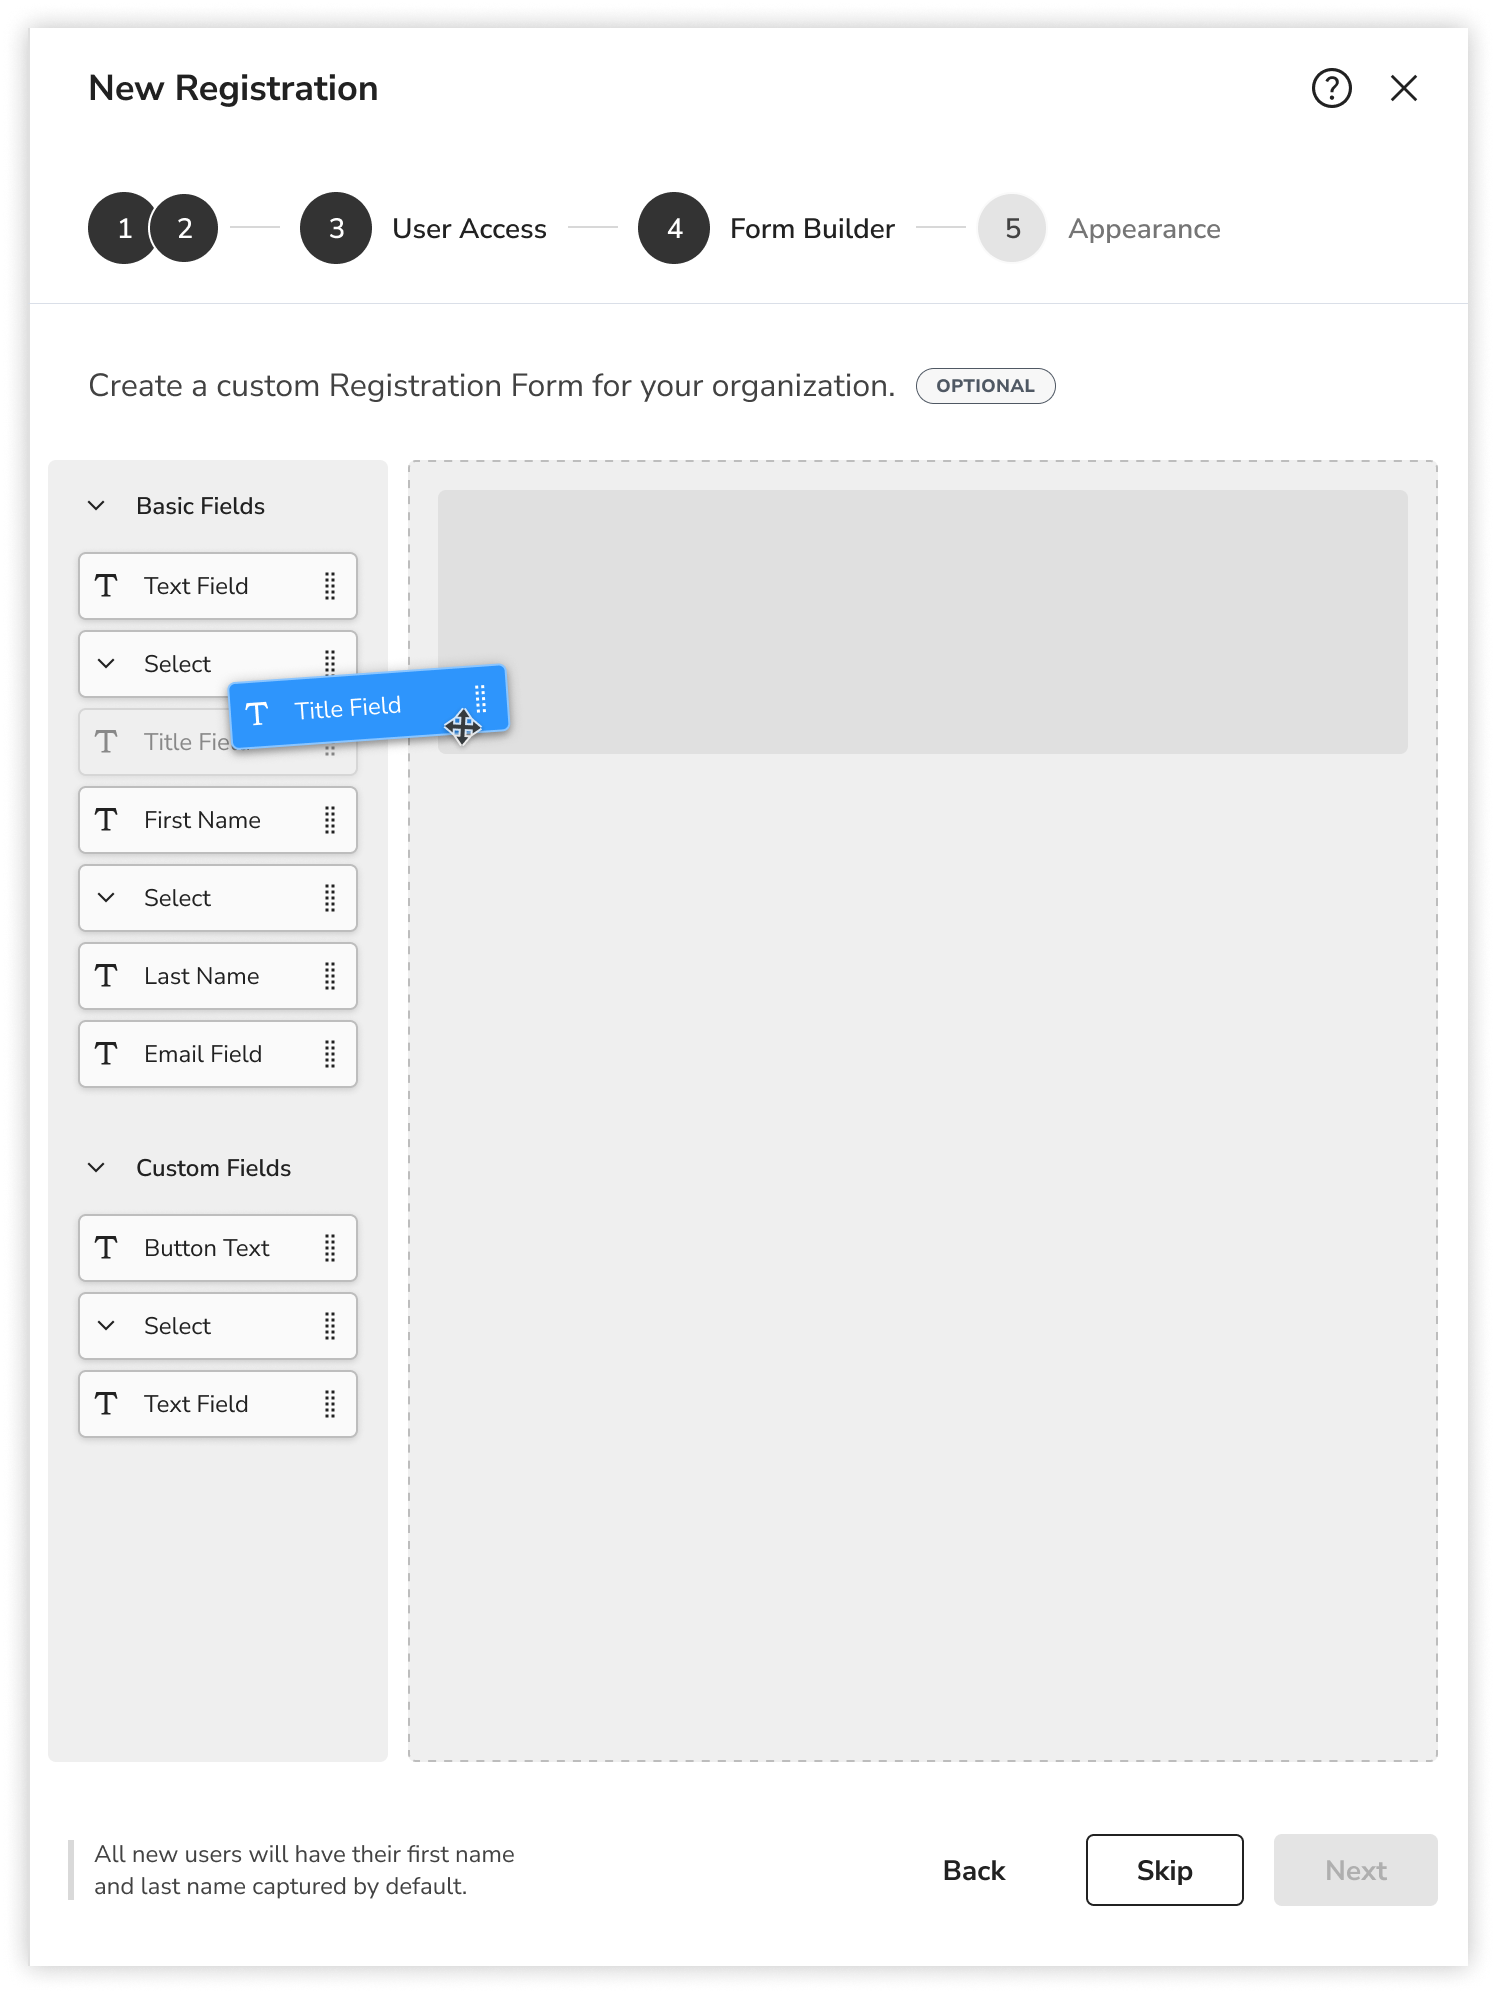
Build a custom registration form
New registration wizard step 4: Form Builder
You can use the form builder to define custom user info during their registration process. The form builder is a drag and drop interface that allows you to choose the types of data your form will include.
|
Type
|
Description
|
Setting
|
|
Number
|
Allows the user to input numbers only
|
Add a minimum and maximum number
|
|
Text
|
Allows the user to input a string of text
|
Adds a placeholder text to the input field
|
|
Select
|
Allows the user to choose from pre-defined values
|
Allows you to define the selectable options. Hit Enter/Return to add new options
|
|
Date
|
Allows you to choose from a selectable date in time
|
No settings
|
|
Email
|
Allows the user to input a valid email address
|
No settings
|
Customize the element:
-
Name the form element. This will replace the default name. The name is shown to users.
-
Select the settings icon  to continue customizing the element. Note that for the Select element type, this will give you the ability to add the additional selectable options for users.
-
Control the order of each form element by dragging the element to a different position.
-
Click the trashcan icon to delete that specific element.
.png)
Click the Next button to continue to step 5.
Set the appearance
New registration wizard step 5: Appearance
The last step of the registration process allows you to further customize the look and feel of the branded login page.
.png)
- Customize Button Color: Customize the button text and color for buttons available to the user during the registration process. Select from the predefined color swatches or use your own hex value. See this link for help choosing a hex code.
- Remove Veritone Branding: Veritone and aiWARE branding will be present in the footer of the page. Toggle off to remove it.
Click Create Registration to complete the process.

