This tutorial describes how to create a flow that uses a facial recognition engine to recognize a customer from an existing library. If the customer is not in the library, then the flow adds the customer to the library automatically.
Click Done to close the node properties and save the changes. After the flow is triggered, the JSON is available in msg.payload.aiwareChunk.
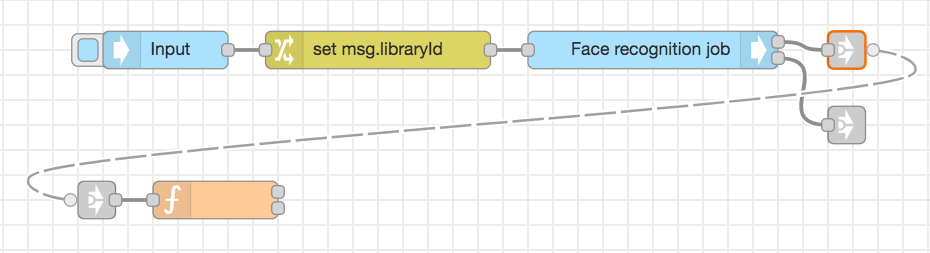
Step 4: Set the change node
Drag the Change node and drop it next to the previous node. Double-click the node to open the node properties.
In the Rules section, make sure the Set rule is selected.
Set the first Input Type to msg, then set the value to libraryId
Set the second Input Type to msg, then set the value to payload.aiwareChunk.libraryCustomer
Click Done to close the node properties and save the changes.
Wire the Input node to the Change node.
Step 5: Set the cognition node
Drag the cognition core node and drop it next to the previous node. Next, wire up the two nodes.
Double-click the cognition core node to open the node properties. In node properties, do the following:
Rename the node to "Face recognition job."
Click Category > Facial Detection.
Click Engine > Face Recognition - A V3. Under Library, select Customers.
In Advanced Settings > Cluster, select prd5 - Adhoc Cluster.
In Job Priority, select Very High.
Check Wait for results. This pauses the flow and proceeds to the next node when the job is done and the results are generated.
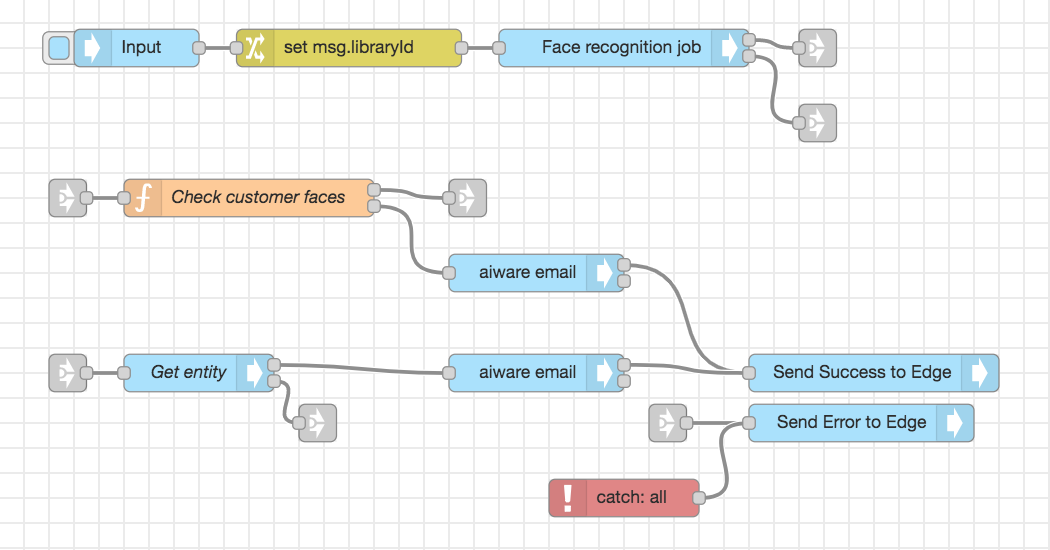
To save and close the node properties, click Done. At this stage, the flow looks like this:
Step 6: Set the Function node
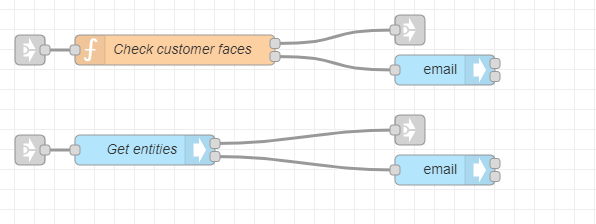
Drag the Function node from the Node Palette and drop it below the Input node. Before adding any javascript to this node, add some link nodes the canvas.
Add two link out nodes from the node palette and add them after the Face recognition job node, one above the other.
Link the Success output and the Error output to the link nodes.
Add a link-in node and put it in front the Function node.
Link the Succcess output from the Face recognition job node to the Function node. Wire the link-out node from the Face recognition job node to the link-in node that's wired to the Function node.
The flow looks like this:
Double-click the Function node to open the node properties. Rename the node to "Check customer faces."
Copy this code and paste it in the Function node:
let faces = [];
if (msg.payload.aiware && msg.payload.aiware.engineResult.series && msg.payload.aiware.engineResult.series.length > 0) {
 faces = msg.payload.aiware.engineResult.series;
} else {
 faces = [];
}

let knownFaces = faces.filter(face => {
 if (face && face.entityId) {
 return face;
 }
});

if(knownFaces.length > 0) {
    let Indexconfidence = 0;
    let maxconfidence = knownFaces[0].object.confidence;
    for(let i = 1; i < knownFaces.length - 1; i++){
     if (maxconfidence < knownFaces[i].object.confidence) {
        maxconfidence = knownFaces[i].object.confidence;
        Indexconfidence = i;
        }
    }

    let faceCustomer = knownFaces[Indexconfidence];
    msg.confidence = faceCustomer.object.confidence.toFixed(2);
    msg.payload = {
     "faces": faceCustomer,
    };
    return [msg, null];
} else {
    msg.payload = "Couldn't find a match";
    return [null, msg];
}
[Note] When the array is returned from the function node, make sure to create the same number of node outputs as the number of the elements in the returned array. The first element in the output is returned from the upper node output and so on respectively. Add outputs by setting the Outputs field to a higher number.
This code iterates through the Engine result and looks for known faces (those that have an entity ID). Then it looks for the result with the highest confidence rate and returns it to the next node.
Set the Outputs to 2 - one for success and one for failure.
To save and close the node properties, click Done.
If there's a match, the result returns from the upper output. Otherwise, a Couldn't find a match message is returned from the lower output.
Step 7: Set the API node
The API node runs GraphQL queries.
Drag the api node and drop it few lines below the Function node.
Wire the success output of the Function node with the api node using the link out and link in nodes like in the previous steps.
To open the node properties, double-click on the api node. In node properties, change the following:
Rename the node to "Get entity."
Select the mustache syntax from the dropdown menu and paste the following GraphQL query to the query input area:
   query{
     entity(id:"{{payload.faces.entityId}}"){
       id
       name
     }
   }
[Note] Using the mustache syntax, provide the entity ID dynamically from the msg object.
To save and close the node properties, click Done.
Add a link out node and wire it to the error output (the lower one) of the api node.
Step 8: Set the aiware email nodes
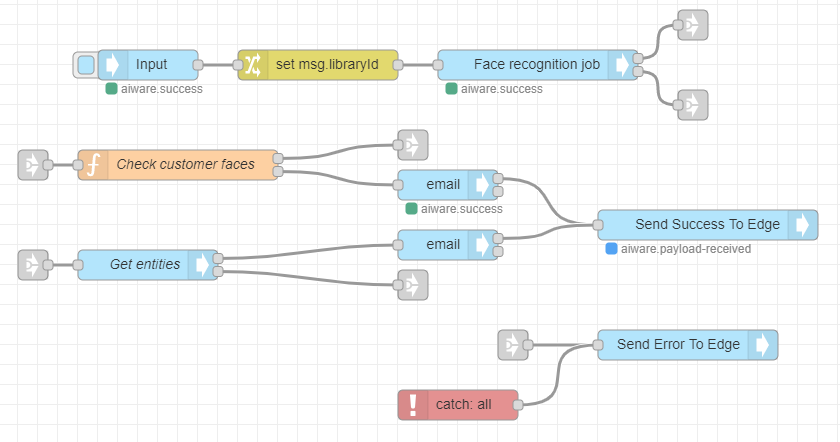
Drag two email nodes and wire them to the Function node and the api node as shown:
The upper email node sends an email when no match is found, and the second node sends an email when there is a match and will receive its payload from the api node.
Double-click the Function node to open its properties.
For To Email, choose the type of string, and type the recipient email address (or addresses separated by a comma).
For the Email Subject, choose the string type. Paste the following in the box: Automate: Customer Recognition by Face.
For the Message Body box, choose the msg type. Our message is contained in the payload property of the msg object. Type payload in the box.
To save and close the node properties, click Done.
Open the second node properties. The settings are basically the same as for the previous aiware email node. The only difference is the Message Body Input.
Choose expression as the input type and paste the following expression:
"Dear user,<br><br>Customer is " & msg.payload.entity.name & " with confidence: " & 100*$number(msg.confidence) & "%.<br><br>Thanks"
To save and close the node properties, click Done.
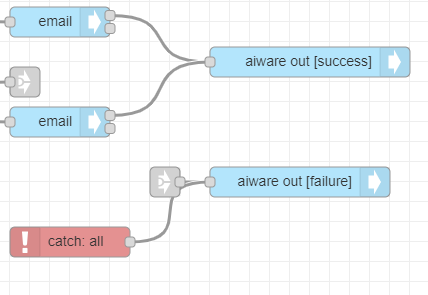
Step 9: Set the output nodes and error handling
Add two aiware out nodes, a catch node, and a link in node and wire them up as in the image below:
Open the upper aiware out node properties and change the following:
Rename it to "Send Success To AI Processing."
Set the output status to Success.
Open the second aiware out node properties and change the following:
Rename it to "Send Error To AI Processing."
Set the output status to Failure.
Wire the link out nodes for error output from the Cognition node and the api node to the link in node for the Send Error to AI Processing node link in the image below:
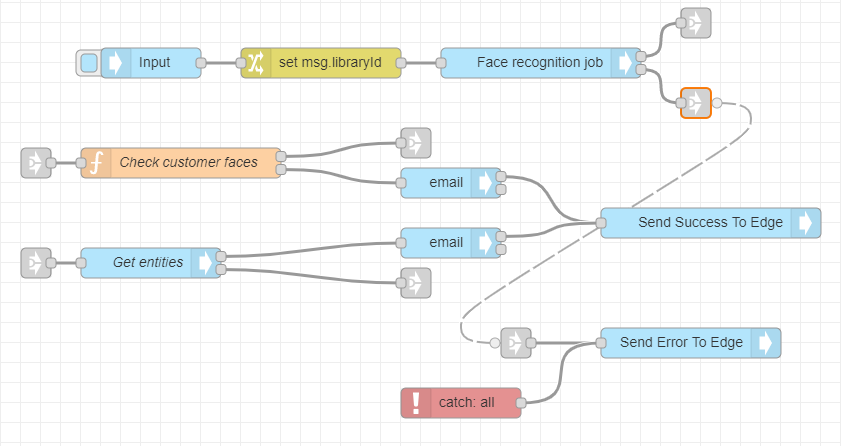
Step 10: Run the flow
The result is an output that looks like:
Select the checkbox on the aiware-in node.
Select the bug icon on the sidebar to follow the job progress and debug the node from the Debug window.
The flow completes in a few minutes and the results are sent to your email.