In this tutorial you will install Tagbox and use the API to generate tags that describe images. First, ensure you have Docker installed.
1. Run Tagbox
Perform a docker run on the machinebox/tagbox image with the MB_KEY environment variable configured.
You can get the commands you need to run from your Account page where we auto-fill your key.
Open a terminal, and run:
MB_KEY="INSERT-YOUR-KEY-HERE"
docker run -p 8080:8080 -e "MB_KEY=$MB_KEY" machinebox/tagbox
- Replace
INSERT-YOUR-KEY-HERE with your box key -p 8080:8080 tells Docker to expose the container's port :8080 as your local port :8080-e "MB_KEY=$MB_KEY" provides the MB_KEY environment variable to the containermachinebox/tagbox is the name of the Tagbox image on Docker Hub
This command will download the latest version of Tagbox, if needed, and spin up a running container. Assuming you see no error messages, it's time to jump into the interactive console.
2. Open the interactive console
The interactive console is the homepage for every box. You can use it to learn about the capabilities of the box, see what API calls are available, and make calls. Once your box is running, open a web browser and go to http://localhost:8080/. You should see the latest Tagbox console. The left side of the page shows the status of the box. Boxes can take a few seconds to warm up, so wait until you see the status change to Ready before continuing.
3. Submit real images
In the interactive console, go to the /tagbox/check endpoint section, and access the By URL tab. Click the Try it now link to open the panel:
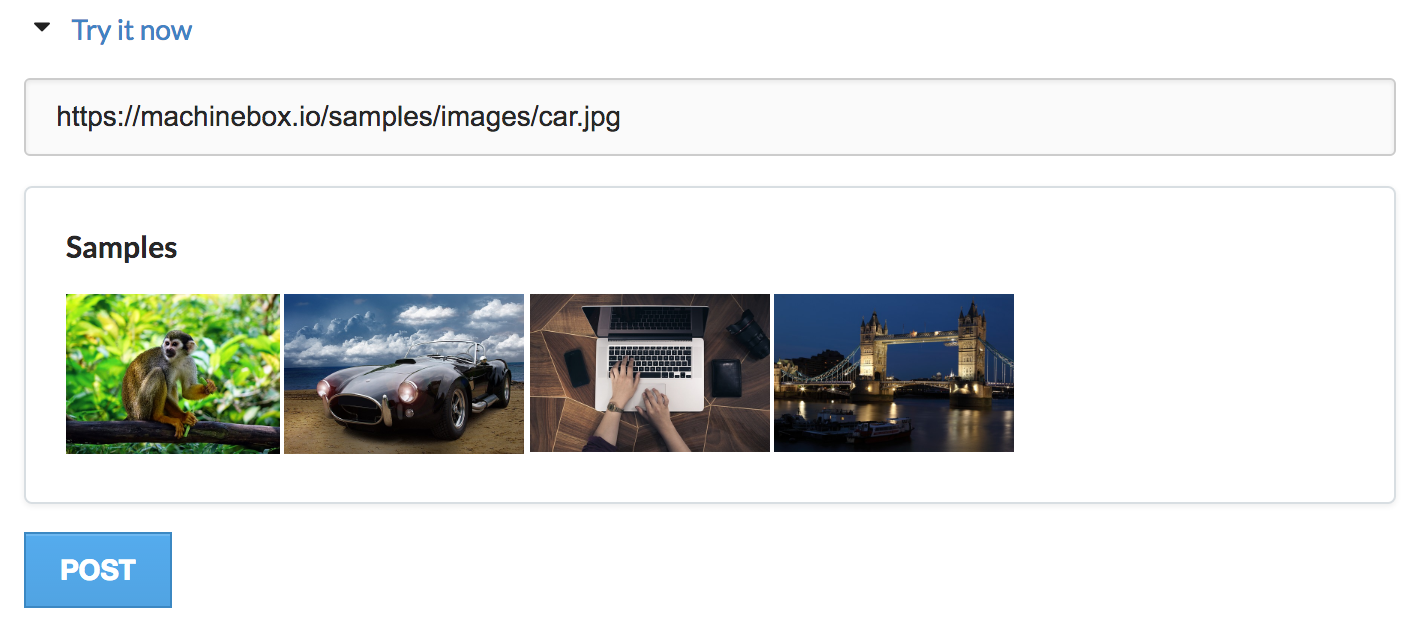
Select the Car image from the Samples section, which will autofill the URL box, and click POST. This will submit a URL to this image:

The API call looks like this:
POST /tagbox/check
{
  "url": "https://machinebox.io/samples/images/car.jpg"
}
The call is made to your locally running Tagbox. The image is downloaded and analyzed and the results are returned. If you submit an image from your local hard-drive (as we do below), the data never leaves your computer. Once analysis is complete, you will be presented with the results:
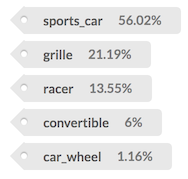
The top result in this case sports_car, which is correct. Try the others too.
4. Understanding the response
The JSON response from the API call is also displayed:
{
  "success": true,
  "tags": [
    {
      "tag": "sports_car",
      "confidence": 0.5602228045463562
    },
    {
      "tag": "grille",
      "confidence": 0.21198685467243195
    },
    {
      "tag": "racer",
      "confidence": 0.13552699983119965
    },
    {
      "tag": "convertible",
      "confidence": 0.060064539313316345
    },
    {
      "tag": "car_wheel",
      "confidence": 0.011693383567035198
    }
  ],
  "custom_tags": [
    {
      "tag": "cars",
      "confidence": 0.67,
      "id": "car1.jpg"
    }
  ]
}
The interactive console explains what this all means, but notice that all the confidence values add up to 1. This is because they are describing a probability. The results are ordered by confidence such that the most likely answer appears first in the array.
5. Making API requests without the console
We don't expect you to use the console to obtain the tags. As a developer, it is your job to integrate with the simple API endpoints to utilize the services. Mac and Unix users can test this the curl command. Open another terminal window and run the following command:
curl -H 'Content-Type: application/json' -d '{"url":"https://machinebox.io/samples/images/monkey.jpg"}' http://localhost:8080/tagbox/check
This will make a RESTful JSON HTTP request to the /tagbox/check endpoint, submitting the monkey.jpg URL. After a moment, the results will be printed to the terminal in JSON format.
6. Submit your own images
Now it's time to see what Tagbox can do when you submit your own images. Go back up and switch to the POST the file tab, and expand the Try it now dropdown. This time, the console will make a different kind of request to Tagbox where the file data is posted directly, instead of being downloaded from a URL. Click Choose file and select a file from your local hard drive before clicking POST.
7. Using your own custom tags
The endpoint http://localhost:8080/tagbox/teach allows you to POST any image and tag and customize Tagbox to your own needs, in your own dataset. Use your own tags to:
- Generalize your image classification problem using tags that represent your business.
- Make corrections in cases that Tagbox returns false positives.
- Search by visual similarity and recommend images that are similar to each other.

