Scheduled jobs allow you to perform AI processing on a data source at a set schedule. Examples include transcribing audio from a radio program every day, or scanning for new items in a podcast program each week. Use the Data Center utility's Scheduled Job wizard to create a scheduled job by selecting an adapter and a data source, then creating a schedule and a directed acyclic graph (DAG) that specifies both the engines to run on the data, and the order to run them in. The DAG Builder in the Scheduled Job wizard simplifies the process of creating intricate task sequences by allowing you to drag and drop tasks and set dependencies via a user-friendly interface.
Access Data Center
To open the Data Center utility, log in to your aiWARE account and click the utility icon  . Select the Data Center folder icon
  . The Data Center panel slides out.
Create a new scheduled job
Steps
-
Click New > Schedule Job. The Select Import Source panel opens. The list of available adapters may depend on the engines that have been provisioned for your organization.
-
Select an adapter for your data type from the Pull list.

The Create Schedule panel opens.
The scheduled job wizard guides you through 6 steps.
1 - Select a Source
Choose a source for the import source. To create a new source, click the drop-down list and then + Create New Source at the bottom of the list.
(Optional) Click Advanced Settings to specify the following:
-
If your organization has more than one instance of aiWARE available for work, you can select a Cluster.
-
For streaming data, you may want to select a different Media Chunk Length. The default setting of 15 minutes works for most sources. The general recommendation is to create chunks of no less than five minutes, and no more than 15. Larger media chunks have more context, which can be helpful for jobs that include speaker separation, for example, or where having more data in a single temporal data object (TDO) would make it easier to find. Smaller chunks can be used to generate some initial results more quickly.
2 - Basic Info
Give the job a name.
3 - Schedule
Choose the time and date for the job to run, and whether it recurs.
[Warning]If you skip this step, the job will run at a default time and you will be unable to find it until it runs.
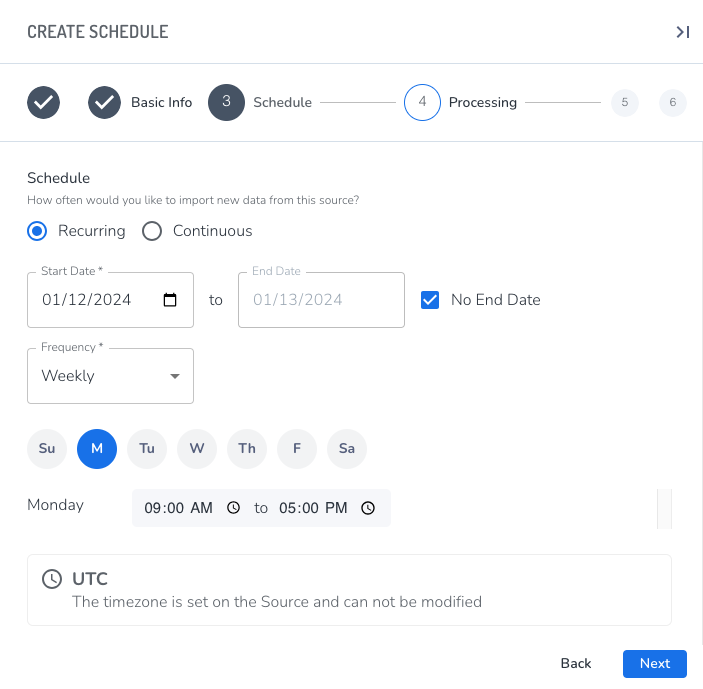
Select either Recurring or Continuous.
- Recurring allows you to set the hourly, daily, or weekly frequency for the job to run. Recurring should be used for data that is released on a schedule, such as broadcast media, or for data that doesn't have a set schedule but is updated from time to time, such as a cloud drive or a podcast that doesn't have a firm release schedule.
- Continuous specifies that the job will run until the end date and time are reached. Continuous should only be used for streams, because it ingests, chunks, and processes data continuously from the start time to the end time, and uses significant processing resources while it runs.
Specify the Start Date and End Date for the job to run. The Start Date can be earlier than the current date in order to capture older data from sources.
[Tip] Be sure to set an end date, especially when testing a new schedule.
Select a Frequency:
-
Hours - The job will run at the specified interval of hours from 1-24, starting at the time the job was created.
-
Days - The job will run every specified number of days at a specified time. As with an hourly frequency, this can be used to ingest content
[Tip] Setting the frequency to Hours or Days can be helpful when ingesting content like podcasts that don't necessarily release new content on a firm schedule; however, it's best to use one of the schedules that specifies the start and end times (Daily, Twice Daily, or Weekly) for any data that is released on a reliable schedule.
-
Daily - The job will run between the specified hours every day.
-
Twice Daily - The job will run between the specified hours twice a day.
-
Weekly - The job will run each selected day during the specified hours.
4 - Processing
This step defines the AI work that should be performed each time the job is run. You can choose an available template, which is useful for jobs that are similar to previous ones. Do one of the following:
- To create a new Ingestion-only job, click Next (Ingest Only).
- To create a your own job template, click Create a New Template. The DAG Builder panel opens.
Build a DAG
While working in the DAG Builder panel, you are still in the 4 - Processing section of the Scheduled Job wizard.
- Give the DAG a name. Click Continue.
- In the DAG Builder window, you can zoom in and out. Click the plus sign on the source box you chose. The Choose a Node Type panel opens.

- Choose a node type.
There are three types of nodes you can add to your DAG. In most cases, you'll choose a cognition engine.
- Starter nodes: These nodes represent the first step of your DAG and are typically represented by a push or pull adapter responsible for collecting the data that will be processed from within your DAG.
- Cognition nodes: Cognition nodes represent AI models. These nodes process data and output AI model results to the TDO. Once you choose a cognition category, a list of engines in that category appears.
- Utility nodes: Utility nodes perform a discrete task against the data that is not cognitive or ingestion based. These are typically automatically inserted into the DAG as you go (see Dependencies, below). Examples of utility nodes include a thumbnail generation node or a chunk creator node, responsible for chunking up the data into processable bits.
- Make sure to add an output writer node, which is a Utility node, after any cognition node where you'd like the data saved. Results from cognition nodes will only be written back to the TDO if there's an output writer.
For example, for a video with audio in English where you want to save its Spanish translation, the nodes would be:
ingest > chunk > transcription > translation > output writer
If you want to save both the English transcription and the Spanish translation, the nodes would be:
ingest > chunk > transcription > two nodes (output writer and translation > output writer)
- Click the + Use This Engine button.
- Click the Add Node button.
- Review your information and click Save.
DAG mini map
A mini map is located at the bottom left corner of the DAG builder window. This color-coded map helps quickly navigate to the desired location on your DAG. This is especially helpful if your DAG is larger in size. Each node in your DAG is color coded based on its unique type:
- Green/Red: Starter node (push or pull)
- Yellow: Cognition nodes (AI models)
- Gray: Utility nodes (output writer, thumbnail generator, or SI2 Chunk creator)
Use your cursor to hover over the mini map and drag to the desired location in your DAG to quickly jump to that area.

Dependencies
aiWARE automatically inserts required nodes into your DAG as you create it. This will usually include utility nodes, which perform tasks such as chunking up your data into consumable processing chunks, or converting your video file into image frames so it can be processed by vision-based cognition models such as facial recognition or logo detection.
These nodes are in a collapsed state when they are added and are represented in gray.
- To modify utility nodes, hover over the node and select Click to Show on the popup, which exposes the entire node and its applicable settings options.
5 - Content Templates
(Optional) If any content templates are available to your organization, use the Content Template pulldown to select one, then complete the form.
6 - Location
- The location is where your job will store the data and any results. Set different folders for jobs by clicking Change to the right of the Home folder.

- Once set, click the Create Scheduled Job button.
The job will run at the appointed time. The first time the job runs, it ingests content that is available at the source location, starting at the specified Start Date and time, which can be earlier than the current date and time. A job maintains a timestamp of the contents it last found, so when the job runs again, it will gather only the new content that is available.
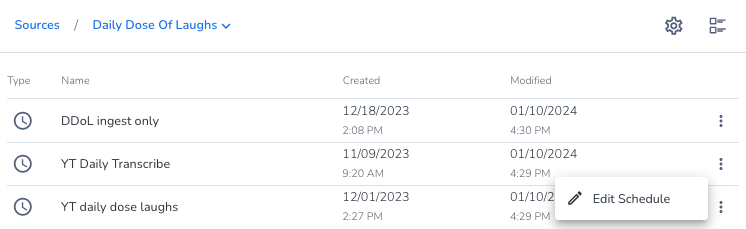
Modify a scheduled job
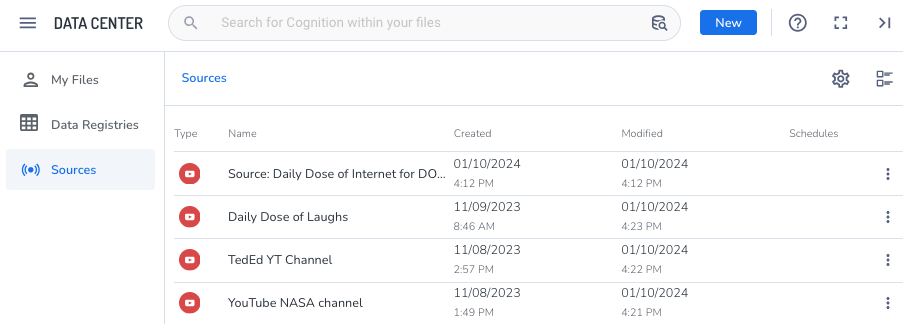
Scheduled jobs are associated with a specific source of data. A source can have more than one scheduled job associated with it. To modify a scheduled job, locate the source and then select the job you want to edit.
Steps
- Click Sources, then select a source in the list. The list of scheduled jobs associated with the source opens.
- Click the three dots icon
 next to the scheduled job and click Edit Schedule. The Edit Schedule wizard will slide open.