In This Article
- General overview of the File Manager page
- Settings overview
- File Manager components
Redact’s File Manager page is where you will spend the majority of your time within the application. This is where you will review any redactions detected by our engines and create manual video and audio redactions. It has two parts: the Editor tab and the Redacted Files tab.
The Editor tab is where you will apply your redactions. The Redacted Files tab is where you can preview your redacted file, and download the redacted media file and audit log, along with the redacted transcript. You can only access the Redacted Files section after you have selected the Redact File button to burn in your redactions.
General overview of the File Manager page
Upon logging in to your Redact account from your Chrome browser and opening a file, you are taken to the Editor tab.
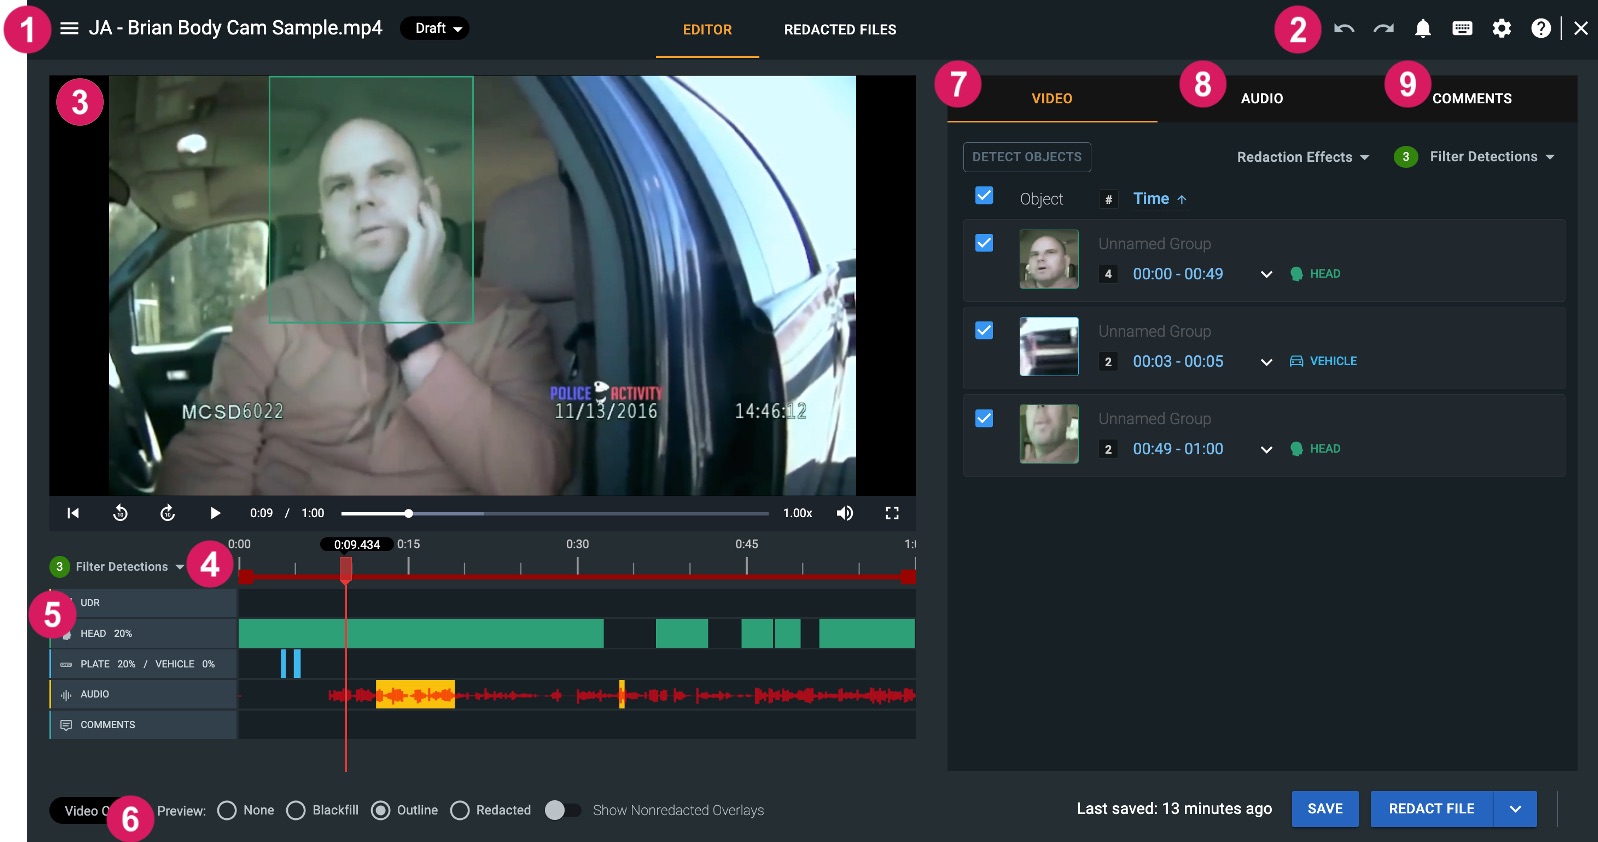
 Hamburger Icon, File Name, & Status Drop Down
Starting in the upper left corner you’ll find the three horizontal bars or the hamburger icon ( ). Here you can switch between any other files uploaded to the same Input Folder.
Next, you will see your file name, which can be changed by using the pencil icon that appears when hovering over the file name.
To the left of your file name is the redaction status dropdown. To help keep you and your team organized, you can update the file status as Draft, Pending Review, or Complete. Note that this does not impact your file in any way, this feature is simply intended to help you organize your workflow.
 Undo/Redo, Notifications, Keyboard Shortcuts, & Settings
To the right of your Editor tab, you’ll find a series of icons:
- Undo/Redo Arrows: These actions allow you to undo and redo the last 20 actions taken during the current user session within the File Manager Page.
- Notification Bell: Provides a status update for any additional files you may have processing in the account. It will alert you once the file completes or if there are any errors.
- Keyboard Icon: Pulls up the legend of shortcuts we have set in the application.
- Settings Gear: Allows you to modify settings for the specific video you are working on. More details on settings can be found in this help article.
- Question Mark Icon: This is where you can access all our help articles and release notes.
 Media Player
Our media player will display the video content that you have uploaded into Redact. For any files that are audio only, the media player will display a black screen.
The media player has all standard controls:
- Forward
- Backward
- Playback speed: Allows you to slow down or speed up your media
- Volume
- Full-Screen option
 Scrub Bar
Beneath the media player is a scrub bar that allows you to zoom in or out on a specific time in the file.
 Timelines
Beneath the scrub bar, you will see timelines that represent each type of video redaction (ie. UDR, Head, Person, etc.). Next to the name for each timeline, the percentage you see is representative of the level of padding applied to each detection type. Padding is defined as how much extra space there is between the objects and the Redaction mask. This can be helpful if the automated redactions are covering too much or too little of the object in question.
 Preview, Save, and Redact File
You can utilize the Preview feature to view your redactions prior to processing and downloading the redacted file. Any changes made here are strictly for review purposes and will not be applied to your final file. By default, redaction masks are displayed as an outline, by selecting blackfill this will replace the outline with a black box over the redaction, and selecting none will completely remove the mask. If you wish to see objects that were detected but not selected for redaction, you can toggle on “Show Unselected.”
Opposite the preview feature, you have the Save button and the Redact File button.
Next to the Redact file button, is an arrow button where you can access Redact’s trimming feature and download your redaction report.
 Video Tab
The video tab on the right of the screen will show any redactions that were automatically detected by our engines, as well as any manually drawn redactions. You can filter and remove specific redaction types as well.
Click the following links to learn more about:
 Audio Tab
The audio tab will provide an English transcription of your media file if the transcription engine is selected and audio is available. This is where you can apply redactions to your audio.
For more information on audio redactions, visit our help article Running Transcription for Audio Redactions.
 Comments Tab
The Comments tab allows you to easily communicate with members of your team members. For more information on adding comments, visit the help article, Adding Comments in Redact.
If you have any questions about the File Manager page, contact the Veritone Support team at Support@veritone.com.

